Introduction
Company Culture
Mission and Vision
Core Values
Engineering
Repositories
Packages
craft-config
A configuration wrapper package for CraftCMS that provides opinionated, pre-configured settings with a clean interface to customize your site configuration.
Tools
ecs
rector
s3sync
forge-utilities
TODO
default-workflows
TODO
Code Quality
Code quality is important because it directly impacts the maintainability and reliability of your software. High-quality code is easier to understand and maintain which reduces the likelihood of runtime bugs and technical debt.
Maintaining code quality can lead to faster development cycles and higher levels of confidence in changes.
PHP
Notes
To save dev time and avoid extraneous commits, code quality checks should be run locally prior to committing and pushing changes to GitHub.
Some projects which had code quality tooling added earlier on have slightly different usage, for example instead of composer run ecs:fix, they might use composer run ecs-fix. Check the composer.json file for the correct name if its not working.
If it's not working in a project locally, please the Head of Engineering know so that they can help resolve it, or allocate the task to someone who can assist. It might be a misconfiguration of the tooling.
If you're struggling with getting checks passing, particularly around phpstan which can sometimes be tricky initially, please create a 1-hour rule (even if its only been a few mins) message and the Head of Engineering so that they can help or point you in the right direction.
Sometimes having phpstan checks pass can get quite complex, especially when targetting higher levels. This can lead to it being a blocker for ongoing development.
To ease development a bit, it is OK to have your working changes merged to staging so that the work can be tested and reviewed, and then posting a 1-hour rule for assistance with getting the code quality checks passing.
PHPStan
PHPStan is a static analysis tool for PHP that examines your code for errors without executing it. It provides early feedback on potential issues and helps enforce best practices to improve overall code quality.
Using PHPStan helps catch errors and potential bugs before runtime, reducing debugging time and increasing overall code stability. It enforces coding standards and best practices, which leads to more maintainable and robust PHP applications.
Target level
- Minimum level: 5
- Target level: 9
Foster Commerce Package
We don't maintain a Foster Commerce specific package anymore.
Example config
TODO setup and link to a repo that has code quality tooling
User guide
https://phpstan.org/user-guide/getting-started
Stubs
In CraftCMS sites, we're able to add custom fields to elements. So that IDE's know about those fields, Craft includes a CustomFieldBehavior php class in storage/runtime/compiled_classes.
PHPStan has a config called scanFiles that lets us include some extra files where PHPStan can find type definitions. However, during CI, the CustomFieldBehavior file isn't present.
Therefore, we need to explicitly generate a copy of that file. To support this, generally a generate_stubs.php file exists in a projects scripts directory.
Generating stubs
ddev composer run generate-stubs
Usage
In a PHP app/website
We typically use DDEV for local development of PHP apps or websites. As such, PHPStan should be run from within ddev.
To check for potential issues, run:
ddev composer run-script phpstan
In a PHP package
When working on a PHP package, such as a Craft plugin, we typically use composer directly, not from inside ddev. PHPStan can be run directly, instead of from within ddev.
To check for potential issues, run:
composer run-script phpstan
Ignoring errors
Whenever a PHPStan error is ignored, i.e. by using /* @phpstan-ignore-next-line */ comments or similar, a valid reason should be added as to why, or a TODO comment should be included to revisit the issue.
However, you should prefer not to use phpstan-ignore-line or phpstan-ignore-next-line to get checks passing. Oftentimes what phpstan is reporting might be something that could catch us out later on.
Easy Coding Standard
Easy Coding Standard (ECS) is a tool for PHP that integrates popular linters and code formatters to help enforce coding standards and maintain a consistent code style across your project. It automatically analyzes your code against predefined standards, flagging issues and even fixing them when possible to ensure a high level of code quality.
Using ECS reduces the manual effort required to format code and resolve style issues, allowing developers to focus more on building functionality. It promotes a uniform codebase that adheres to agreed-upon guidelines, ultimately improving readability, maintainability, and overall project quality.
Foster Commerce Package
Example config
TODO setup and link to a repo that has code quality tooling
User guide
https://github.com/easy-coding-standard/easy-coding-standard
Usage
Note: ECS changes are relatively safe and are generally cleanup/formatting type changes. It is still recommended to review any changes made by ECS before committing.
In a PHP app/website
We typically use DDEV for local development of PHP apps or websites. As such, ECS should be run from within ddev.
To check for formatting changes, run:
ddev composer run-script ecs:check
To apply any fixes use:
ddev composer run-script ecs:fix
In a PHP package
When working on a PHP package, such as a Craft plugin, we typically use composer directly, not from inside ddev. ECS can be run directly, instead of from within ddev.
To check for formatting changes, run:
composer run-script ecs:check
To apply any fixes use:
composer run-script ecs:fix
Rector
Rector is an automated refactoring tool for PHP that applies a set of configurable transformation rules to modernize your codebase. It enables seamless upgrades to newer PHP versions or frameworks by rewriting code without manual intervention.
Using Rector can save significant time during migrations by automating repetitive refactoring tasks, reducing the risk of human error. Additionally, it promotes adherence to modern coding standards and best practices, making it an invaluable asset for maintaining a future-proof and robust codebase.
Note that when Rector makes changes to your code base, you typically need to re-run ECS so that formatting is corrected.
Foster Commerce Package
Example config
TODO setup and link to a repo that has code quality tooling
User guide
https://getrector.com/documentation
Usage
Warning: Rector changes are destructive and need to be thoroughly reviewed. Blindly committing changes made by Rector is discouraged.
In a PHP app/website
We typically use DDEV for local development of PHP apps or websites. As such, Rector should be run from within ddev.
To check for and review possible changes, run:
ddev composer run rector:dry-run
To apply changes:
ddev composer run rector:fix
In a PHP package
When working on a PHP package, such as a Craft plugin, we typically use composer directly, not from inside ddev. Rector can be run directly, instead of from within ddev.
To check for and review possible changes, run:
composer run rector:dry-run
To apply changes:
composer run rector:fix
JavaScript
ESLint
TODO
Prettier
TODO
Dev
DDEV
TODO
IDEs
VSCode
Config
TODO
Extensions
- Composer
- DDEV Manager
- EditorConfig for VS Code
- GitLens
- PHP
- PHP Debug
- PHP Intelephense
- phpstan
- Tailwind CSS IntelliSense
- Twig
PhpStorm
Config
TODO
Plugins
Other than the bundled plugins.
Git
TODO
Enabling Maintenance Mode
It may sometimes be necessary to prevent public access to a site, for instance while moving an ecommerce site to a new server.
Craft has a System Status status setting for doing this. Within the Control Panel, it can be found under Settings->General->System Status.

The setting can be controlled via an environment variable but we don't need to create a custom one (unless you really want to). By using one of Craft's in-built environment variables (starting with CRAFT_) we can control this setting from outside of the Control Panel
CRAFT_IS_SYSTEM_LIVE=true # true|false
Note Using the CRAFT_ environment variable there is no need to specifically set the Control Panel switch as they will automatically be applied within the site's config files. They will override everything.
What happens?
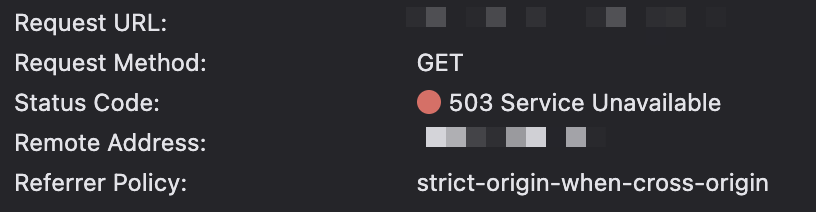
With the site status set to off any visitor to the front-end of the site who is not logged in to the control panel will see a 503 error page.
Site admins can still see the front-end of the site by first logging in to the Control Panel.
Customizing the page
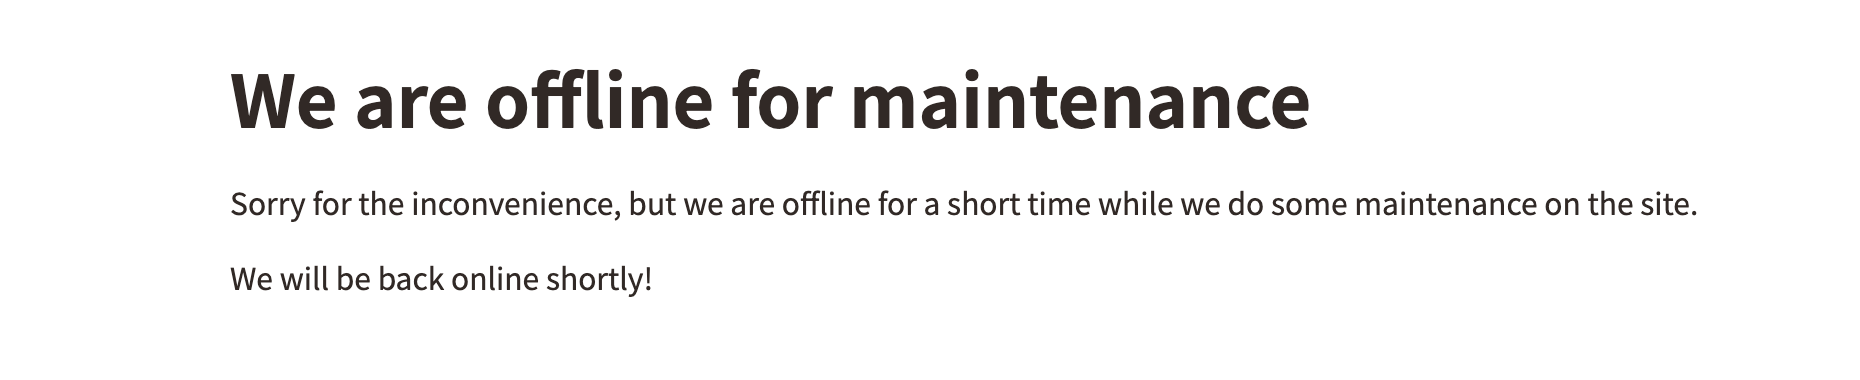
We can customise this page by creating a template named offline.twig in the templates directory (if a custom errors folder is set then the template should be in there). The template can still use Craft Entry data if you like.
Note When the site is in dev mode, the 503 Exception page will always be shown. So in your local environment, turn dev mode off to see the offline template.
Operations
- Digital Ocean Server Provider
- Server Setup
- Reserved IPs
- PHP
- Site Setup
- TLS
- Queue Setup
- GitHub Workflows
- Database
- Digital Ocean Spaces
- MySQL Optimization
- Redis
- Meilisearch Setup
- Reverting to a Previous Release
- tmux Session
- Redirect-only or proxy site Setup
- Auto-restart supervisorctl
Add Server Provider
These are steps to take if this is a new client or client site and their Digital Ocean account isn't already connected to our Forge account. i.e. We don't have an active entry in our Laravel Forge Server Providers page for that client's Digital Ocean account.
Note that this assumes the client's account has already been setup in Digital Ocean and that FC has been added to it so that we can manage their Digital Ocean resources.
After completing this, you'll be able to provision Digital Ocean virtual machines directly from Laravel Forge.
Resources used
Steps
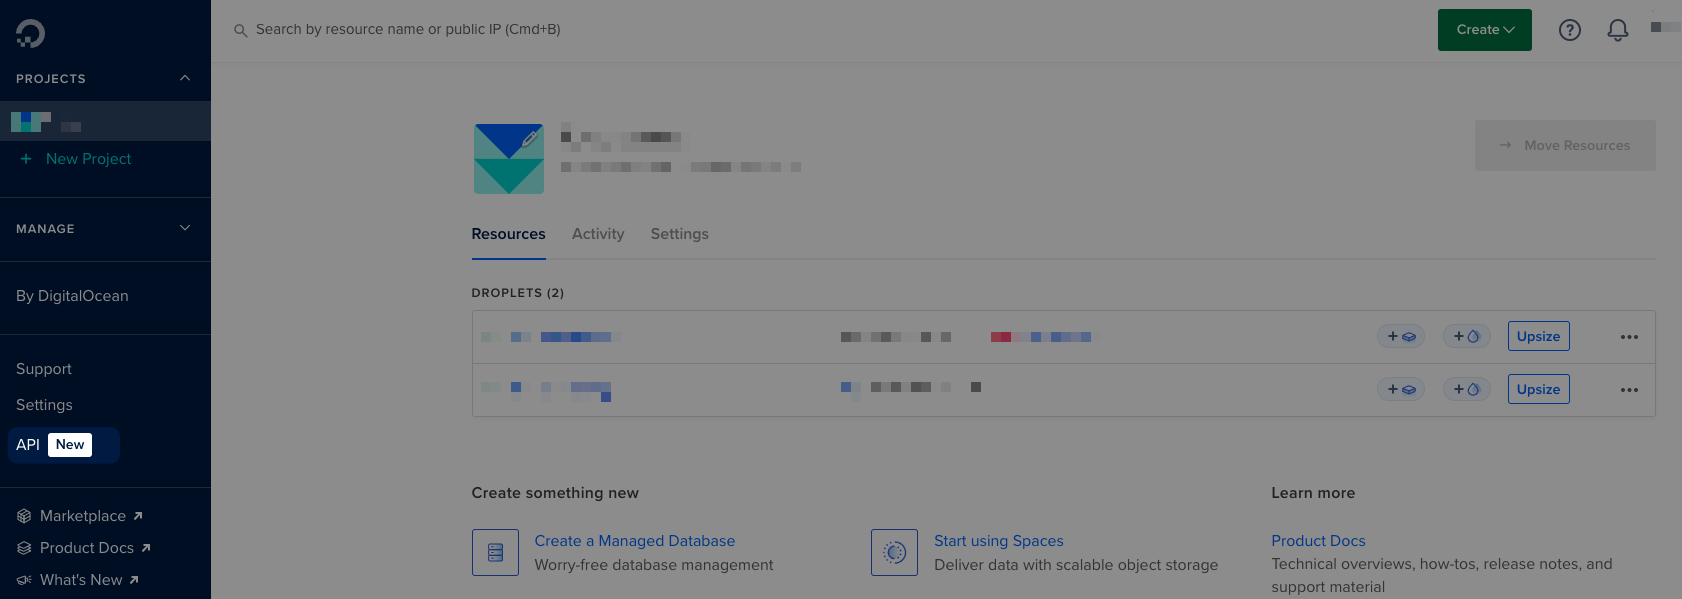
- Navigate to the clients Digital Ocean dashboard
- Navigate to the API settings page.
- On the Applications & API screen on the Tokens tab, select "Generate New Token"
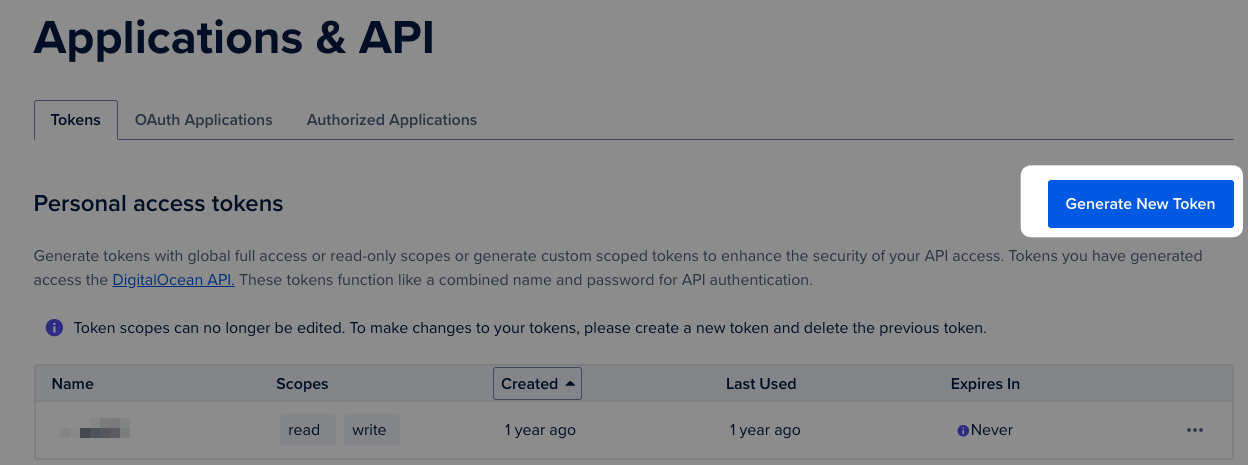
- On the "Create A New Personal Access Token" page, enter the following details:
- Token Name:
forge - Expiration:
No expire - Scopes:
Full Access
- Token Name:
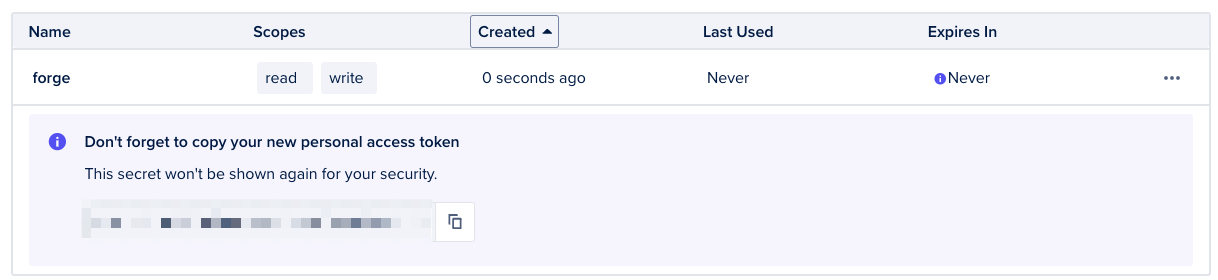
- Click "Generate Token"
- You'll be redirected back to the token listing page, and you'll be shown your new token secret (this is a once-off, then you'll not be able to see it again)
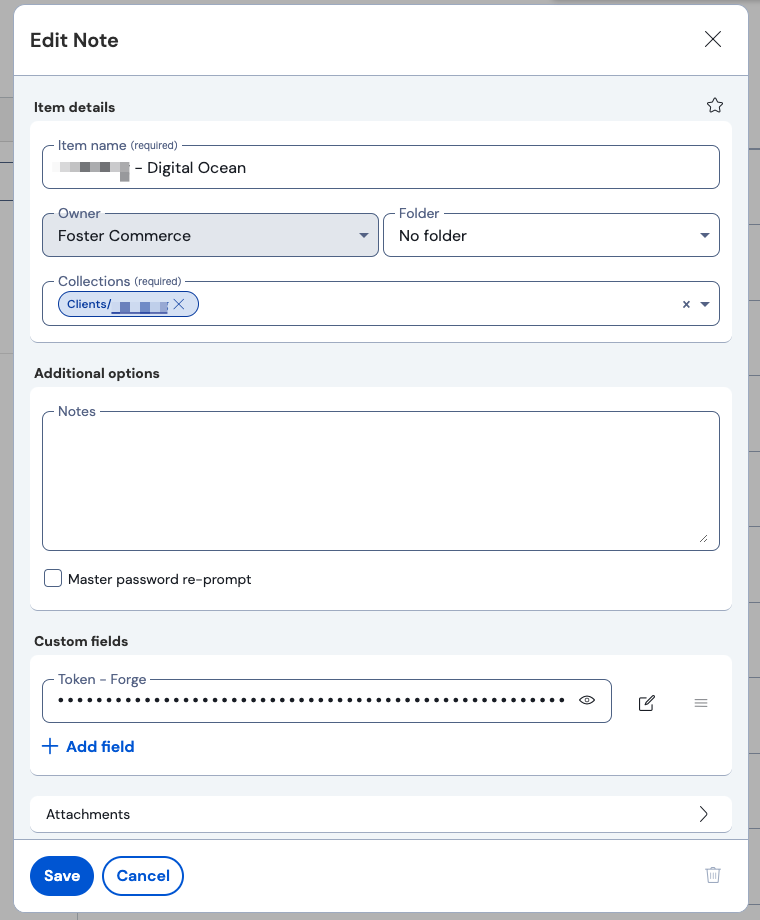
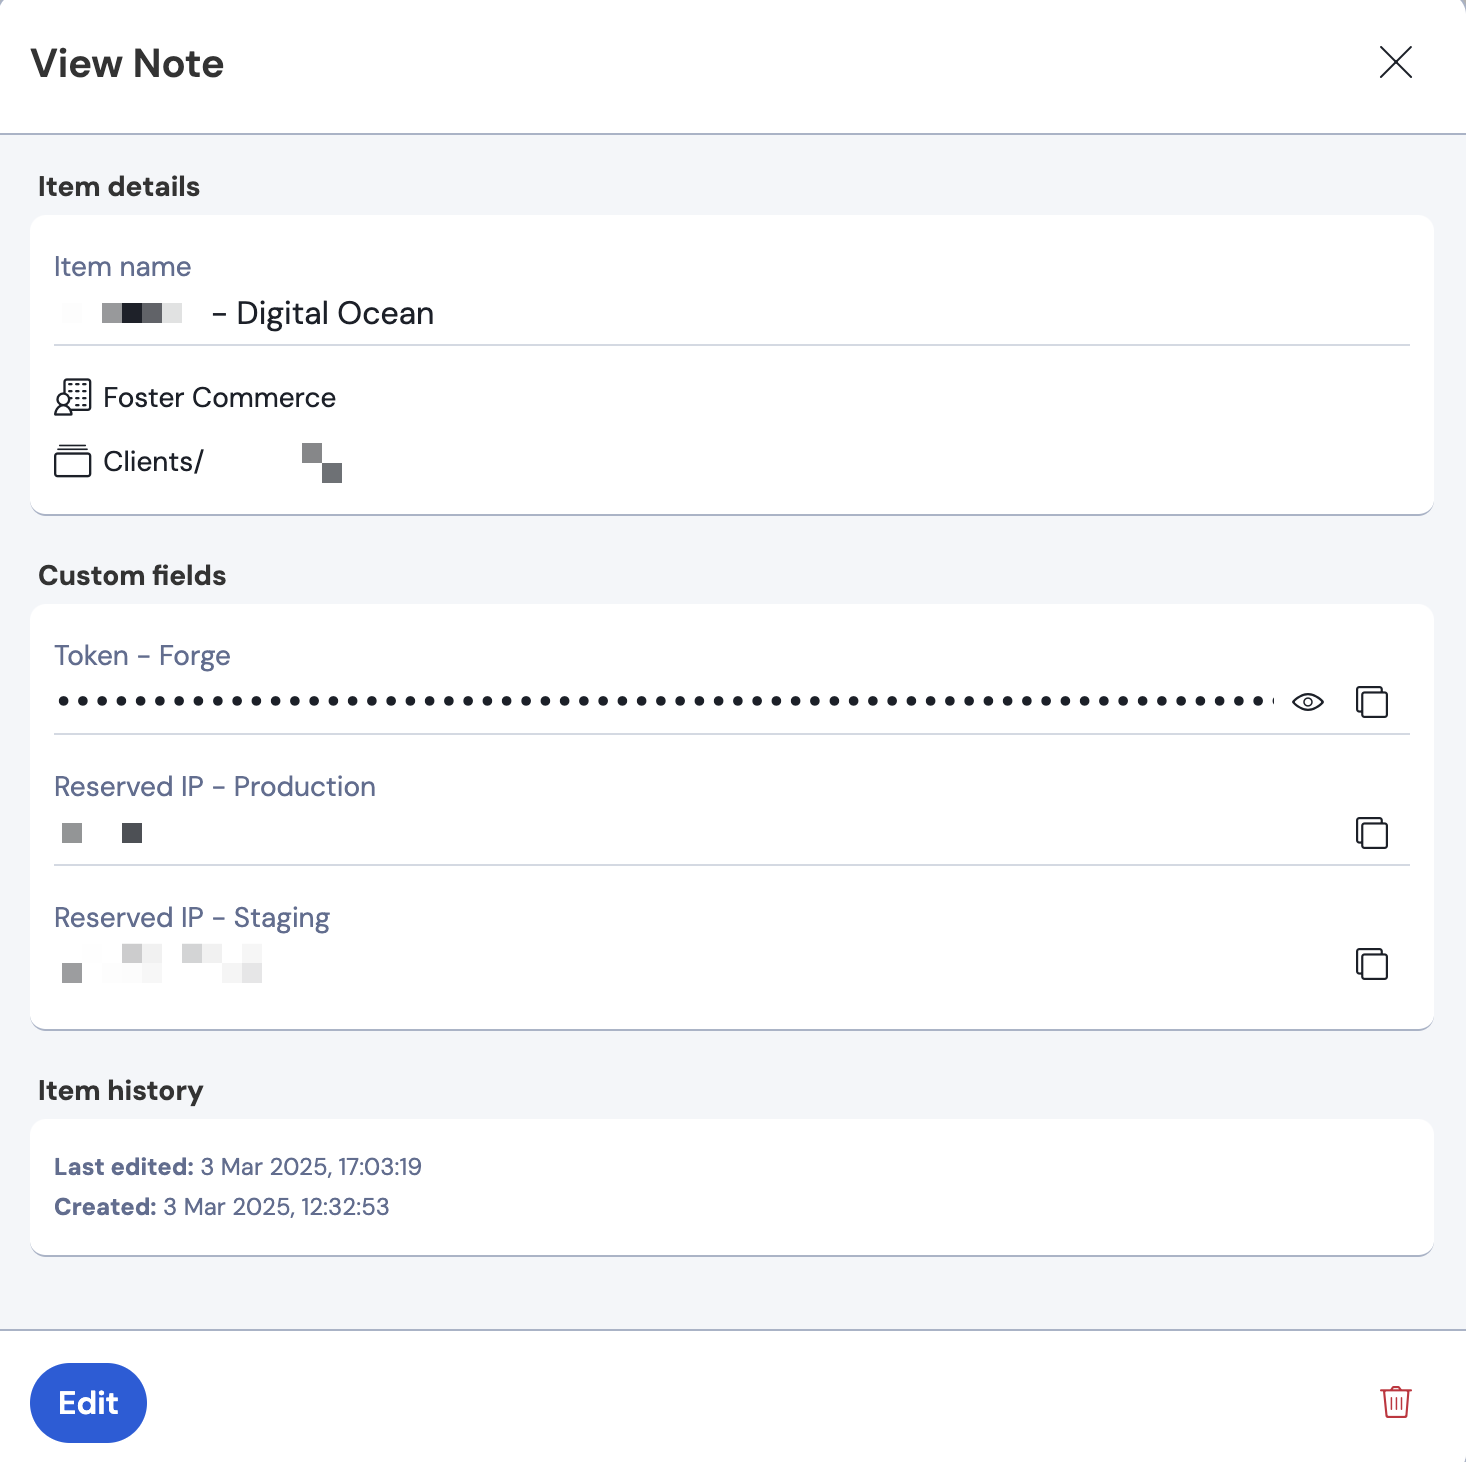
- In Bitwarden, under the clients folder, create a new Note called "
- Digital Ocean" if it doesn't already exist. - In that note, add a secret field called "Token - Forge" with the value of the token generated above.
- In Laravel Forge, navigate to the "My Account" page.
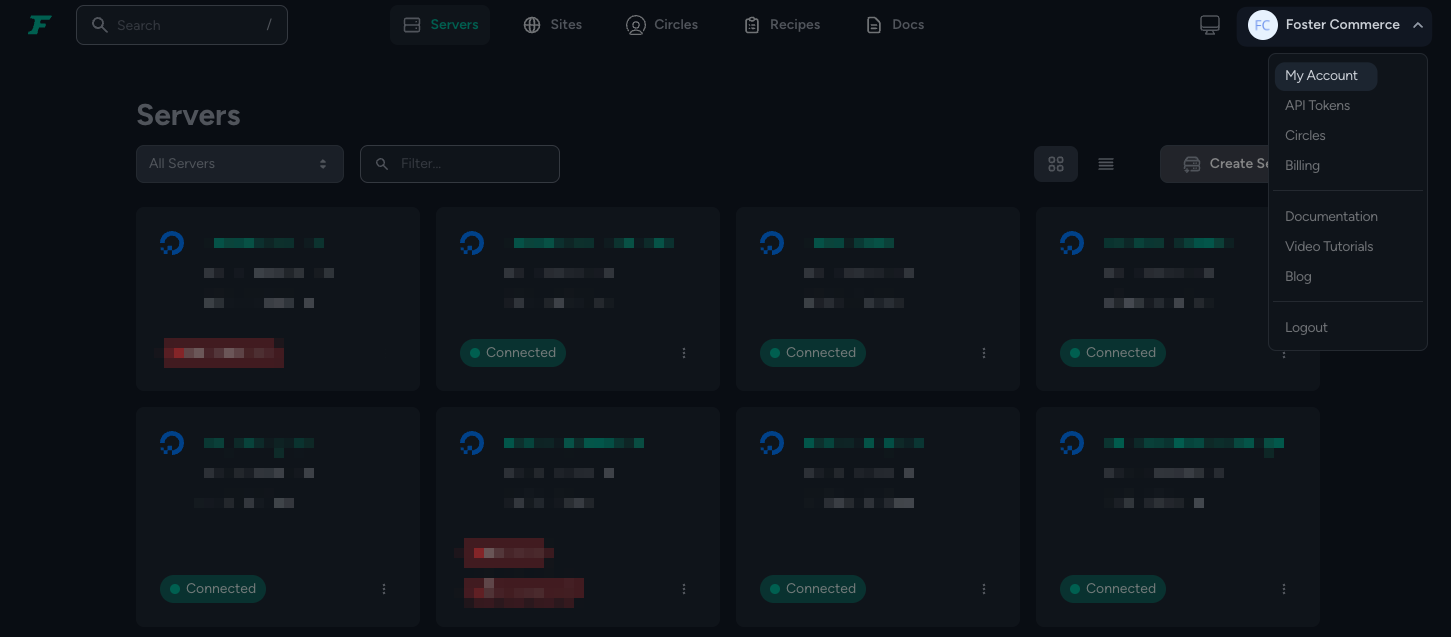
- On the "My Account" page, navigate to "Server Providers" and then click "Provide API Token"
- Ensure "DigitalOcean (2.0)" is selected, and enter the clients name and paste the token into the relevant fields.
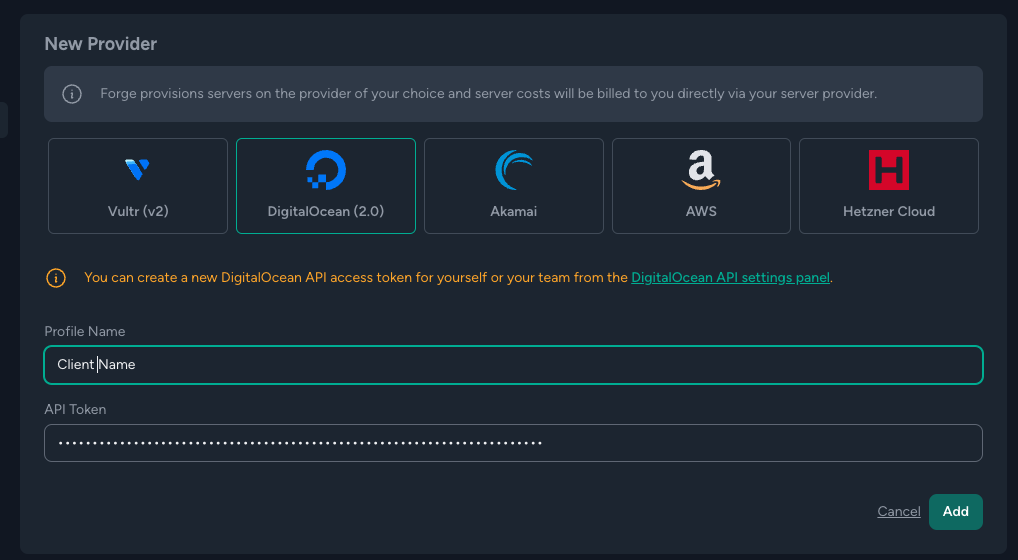
- Click "Add"
- You'll now have new entry in the "Server Providers" list.

Server Setup
Server Policy
- Staging servers are created on the client's Digital Ocean account.
On Laravel Forge with MySQL Database
Requires a Server Provider to be setup in Laravel Forge.
Resources used
Server requirements
These are rule-of-thumb requirements for our servers. We can adjust as needed on a site-by-site basis.
Staging
- Name: clientname-environment, example,
fostercommmerce-staging - Type: App Server (PHP, Nginx, Database, Redis, Memcached)
- Circle: Blank
- Region: If there are existing Digital Ocean resources, then a region closest to those, otherwise a region closest to where most users of the site would be.
- Server size: 2 GB RAM, 1vCPU core, 50GB SSD.
s-1vcpu-2gb
- Network: Create new (if there's no existing network), otherwise, select the existing network.
- Server OS: Ubuntu 24.04 or latest available Ubuntu LTS release.
- PHP Version: 8.3 or latest version that the site supports
- Database: MySQL 8
- Database Name:
clientname, for example,fostercommerce
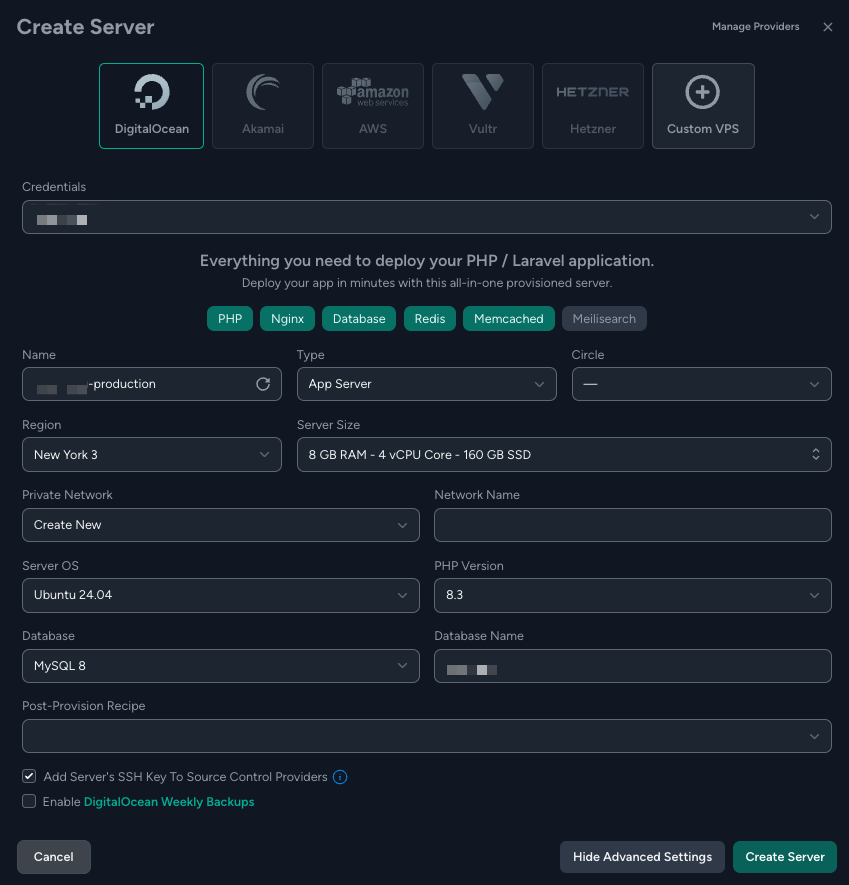
Production
- Name: clientname-environment, example,
fostercommmerce-production - Type: App Server (PHP, Nginx, Database, Redis, Memcached)
- Circle: Blank
- Region: If there are existing Digital Ocean resources, then a region closest to those, otherwise a region closest to where most users of the site would be.
- Server size: 8 GB RAM, 4vCPU core, 160GB SSD.
s-4vcpu-8gb
- Network: Create new (if there's no existing network), otherwise, select the existing network.
- Server OS: Ubuntu 24.04 or latest available Ubuntu LTS release.
- PHP Version: 8.3 or latest version that the site supports
- Database: MySQL 8
- Database Name: clientname, example,
fostercommerce
Steps
- On the Laravel Forge Servers page, click "Create Server".
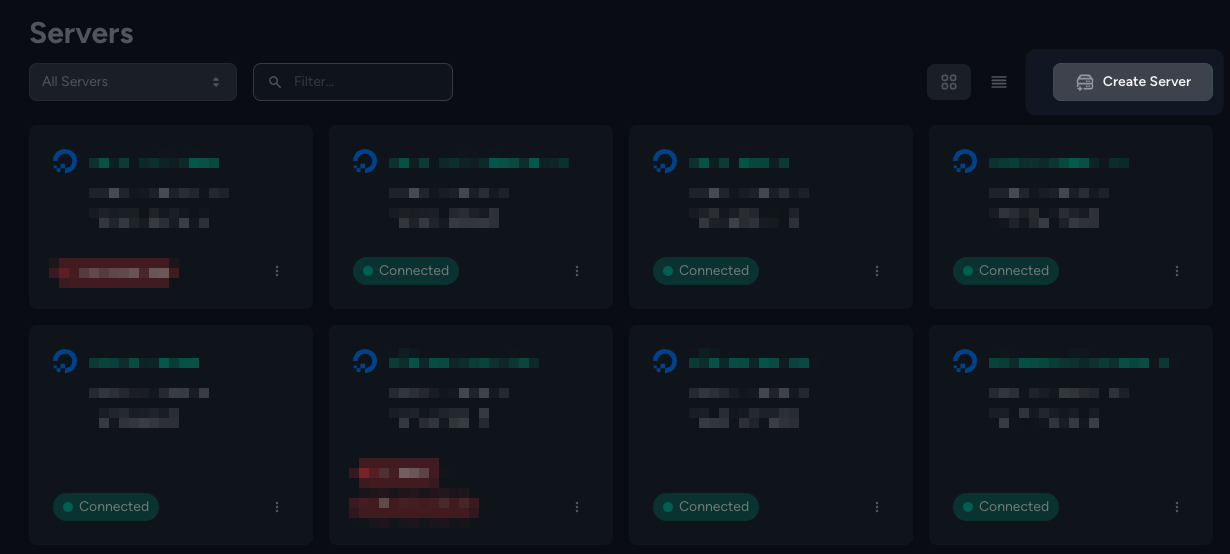
- In the modal that displays, choose the clients credentials.
- Next, complete the "Create Server" form using the details above for either staging or production.
- Leave "Post-Provision Recipe" blank unless there's a specific recipe that is required.
- Ensure "Add Server's SSH Key To Source Control Providers" is checked.
- Ensure DigitalOcean Weekly Backups is unchecked.
- Review the config and click "Create Server" when ready.
- A "Server Credentials" modal will be displayed.
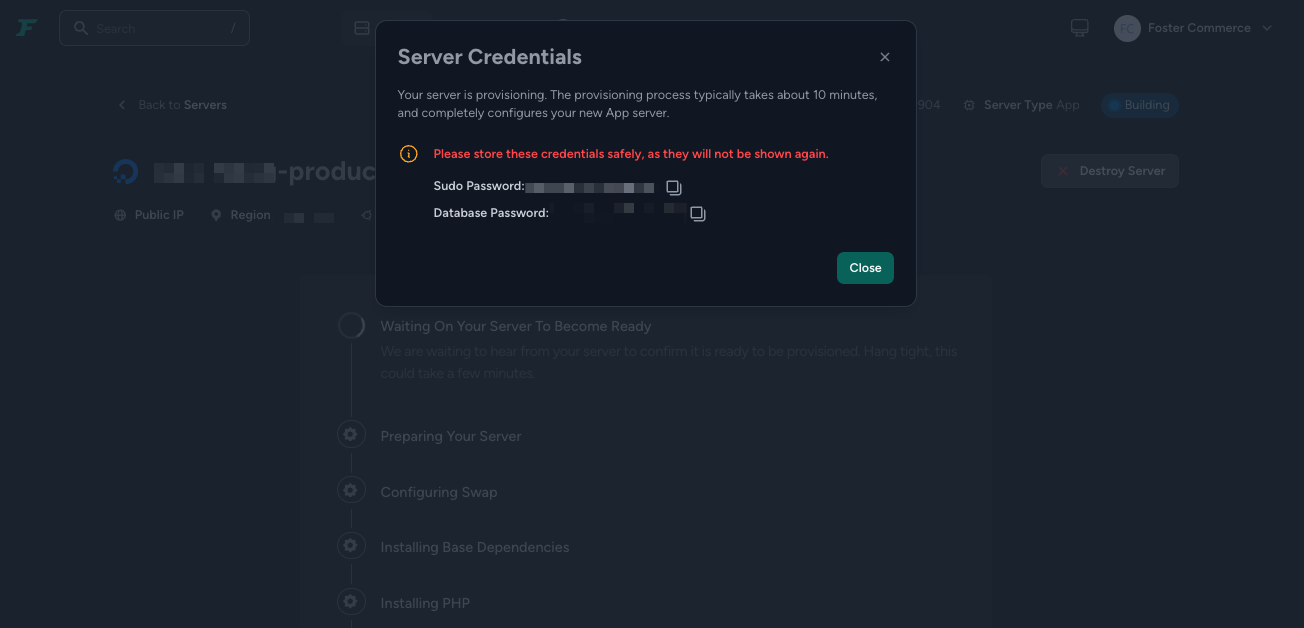
- Save these credentials in a new secure note in Bitwarden called "Forge - {Server Name} - Server".
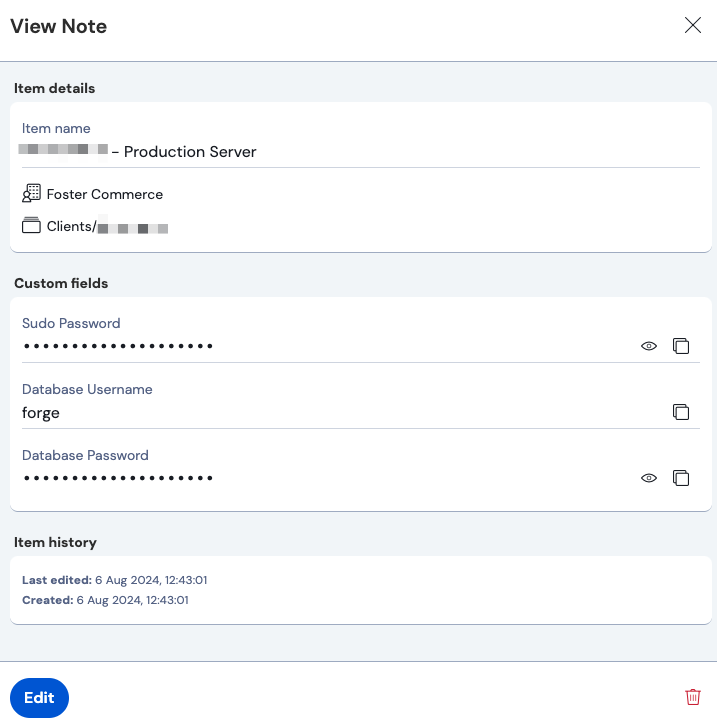
- Ensure that the client folder is selected for the collection
- Fields:
- Name: Sudo Password, type: Hidden
- Name: Database Password, type: Hidden
- (Optional) Name: Database Username, type: Text, value:
forge
- Once those credentials have been saved in Bitwarden, dismiss the modal, and wait for Forge to complete provisioning of the server.
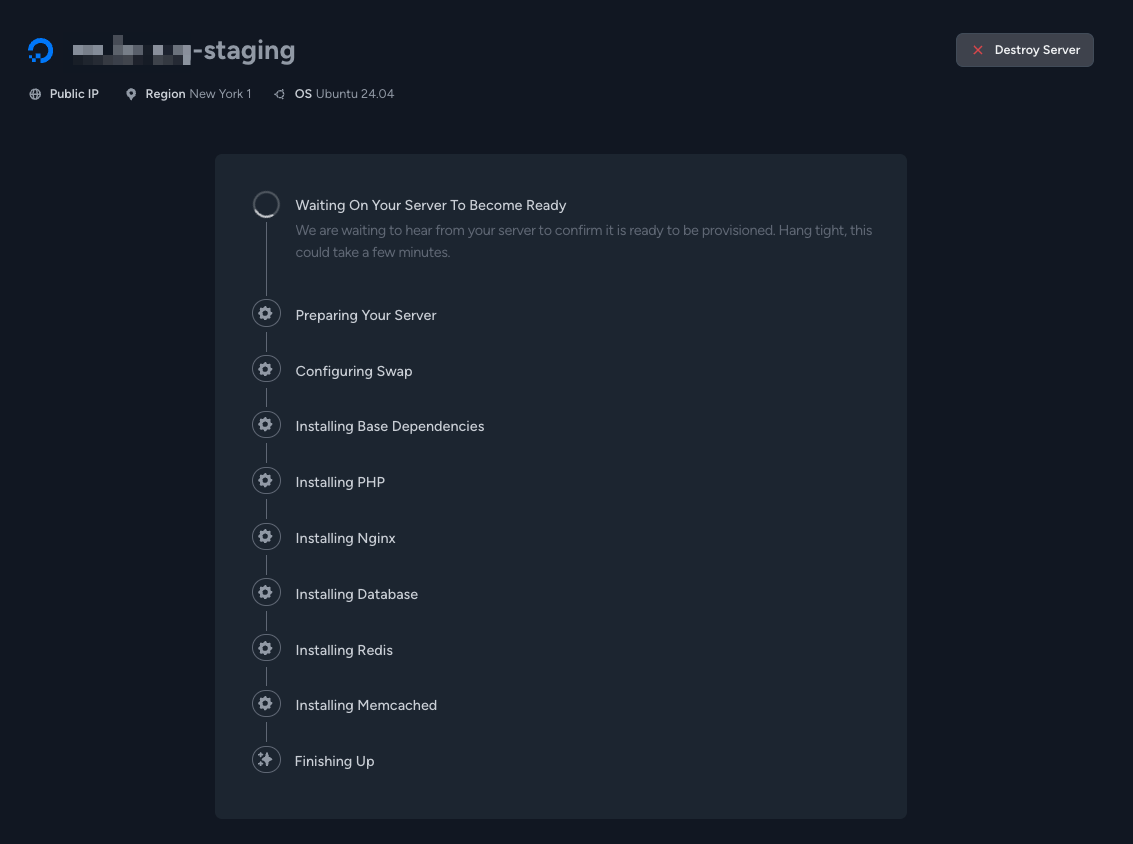
- Once provisioning is done, Forge will load the sites page for that server.
- In Digital Ocean, if this is a new site, assign the Reserved IP to this droplet
- If you're doing a migration to a new server, don't assign the IP yet.
Site Setup
Requires a server to be provisioned.
Resources used
Steps
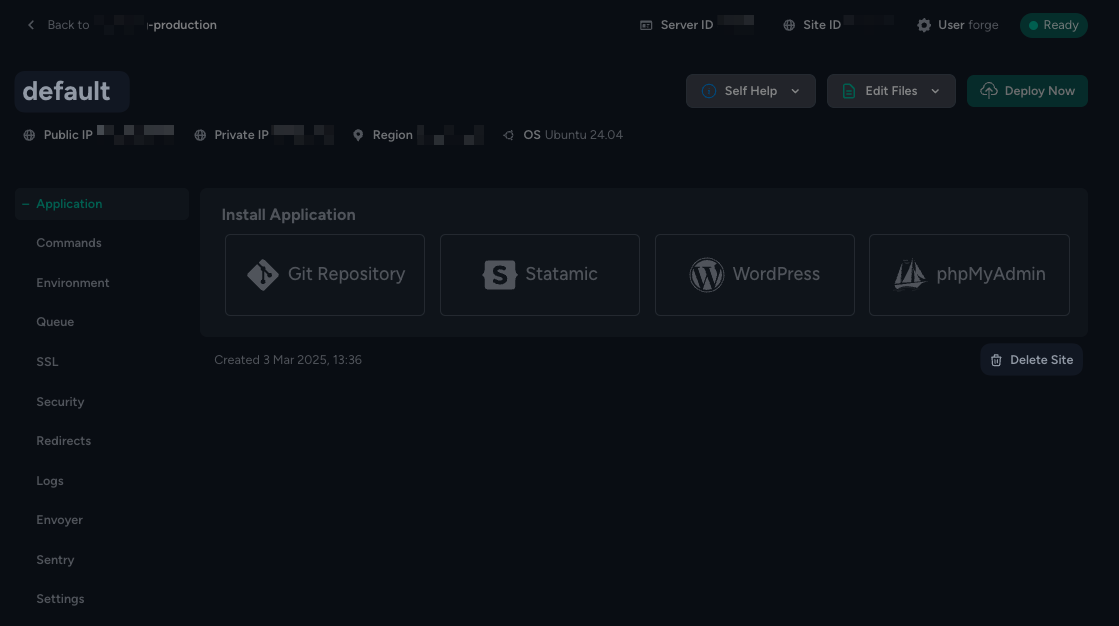
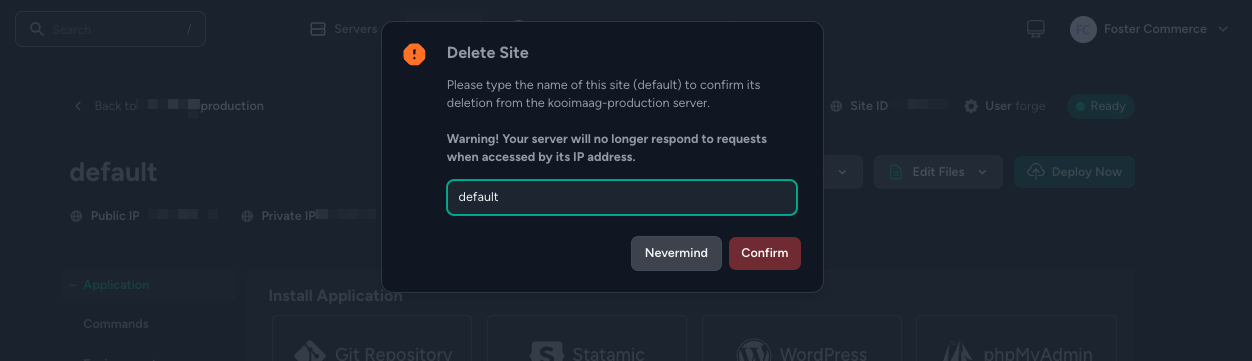
- Delete the default site by clicking the site named "default", and on the page that loads, clicking "Delete Site".
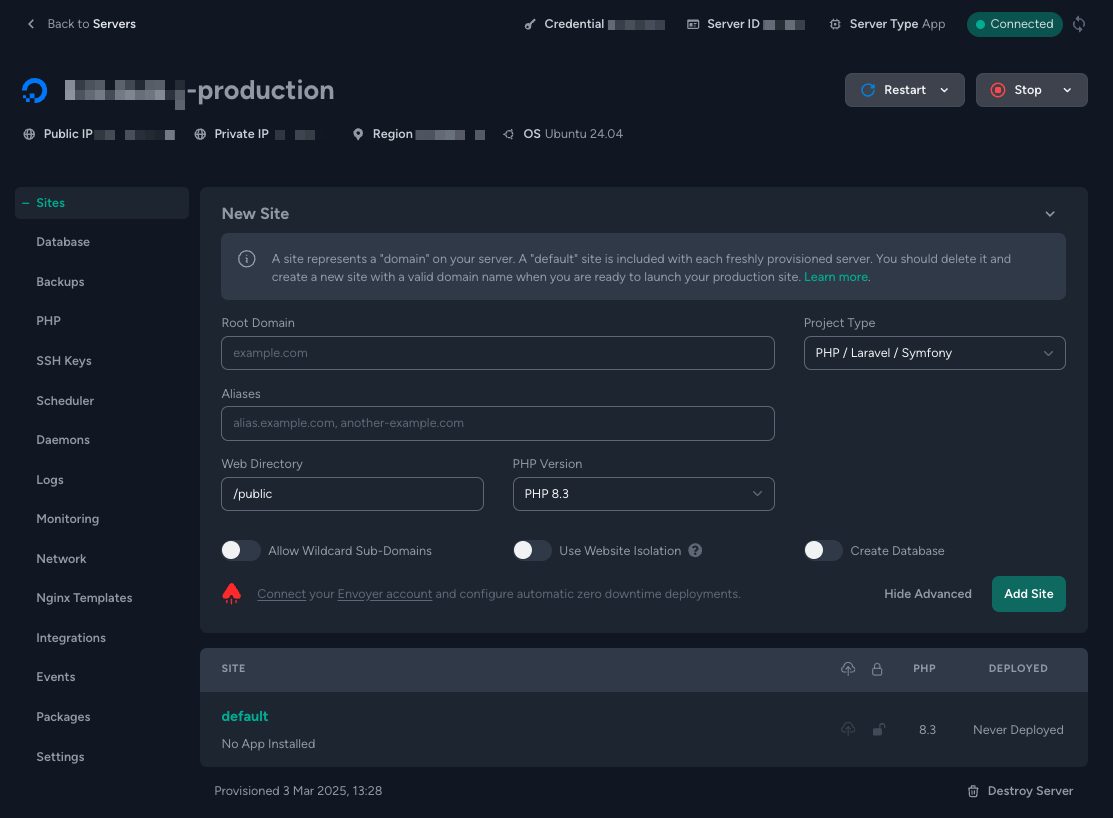
- You'll be redirected back to the server's sites page where it'll show you a form to create a new site.
- Fill out the form with the site details.
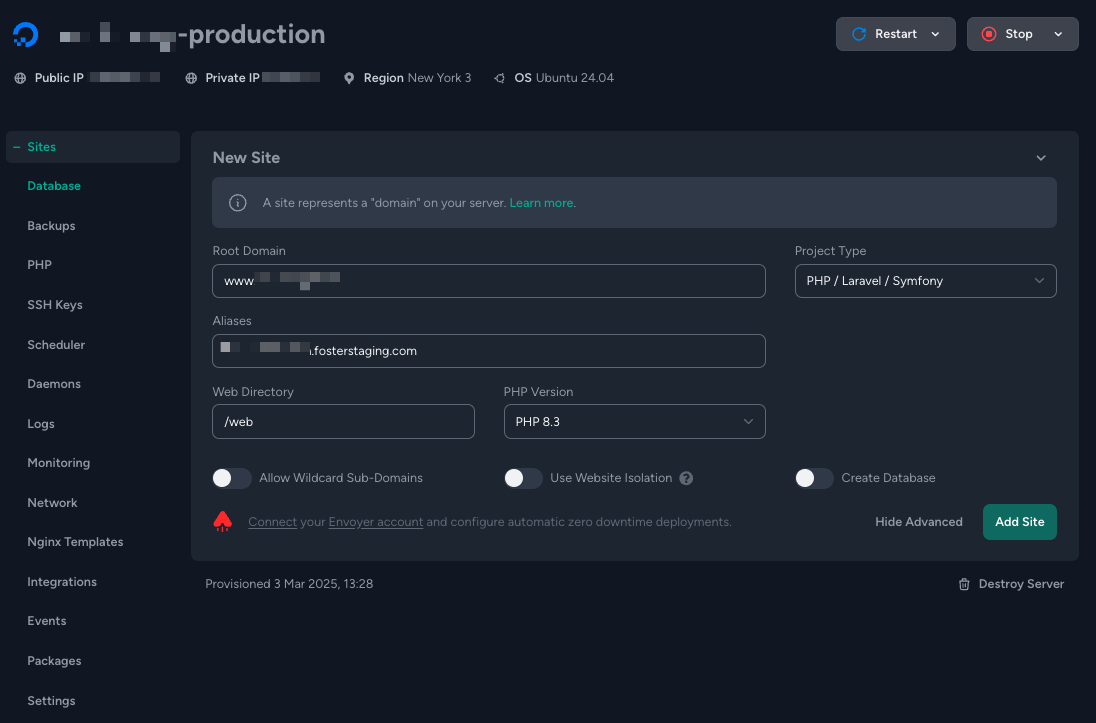
- Root domain: The desired domain name.
- Note: We generally prefix these with www. unless otherwise specified.
- Project Type: PHP/Laravel/Symfony
- Aliases: We can set this if we want to test the server and site setup before actually updating DNS.
- If we want to test this, we can set this to
- .fosterstaging.com, for example, fostercommerce-production.fosterstaging.com.
- If we want to test this, we can set this to
- Web directory:
/web - PHP Version: 8.3, or the highest supported version of the site.
- Leave all toggles off.
- Root domain: The desired domain name.
- Click "Add Site".
- You'll be taken to the sites dashboard. We'll be using deployments from GitHub Actions, so there is nothing left to do here.
- If you've already connected the domain or the alias to the site's IP, then you'll see the default Forge page by navigating to the site.
- Once deployments are setup and working, you'll need to remove the default Forge page because Nginx gives it priority over the index.php file added by CraftCMS. To do that, remove the file:
ssh forge@<server>
rm ~/<site host>/web/index.html
Environment Variables
If you've set up a new site, there won't be any environment variables pre-set.
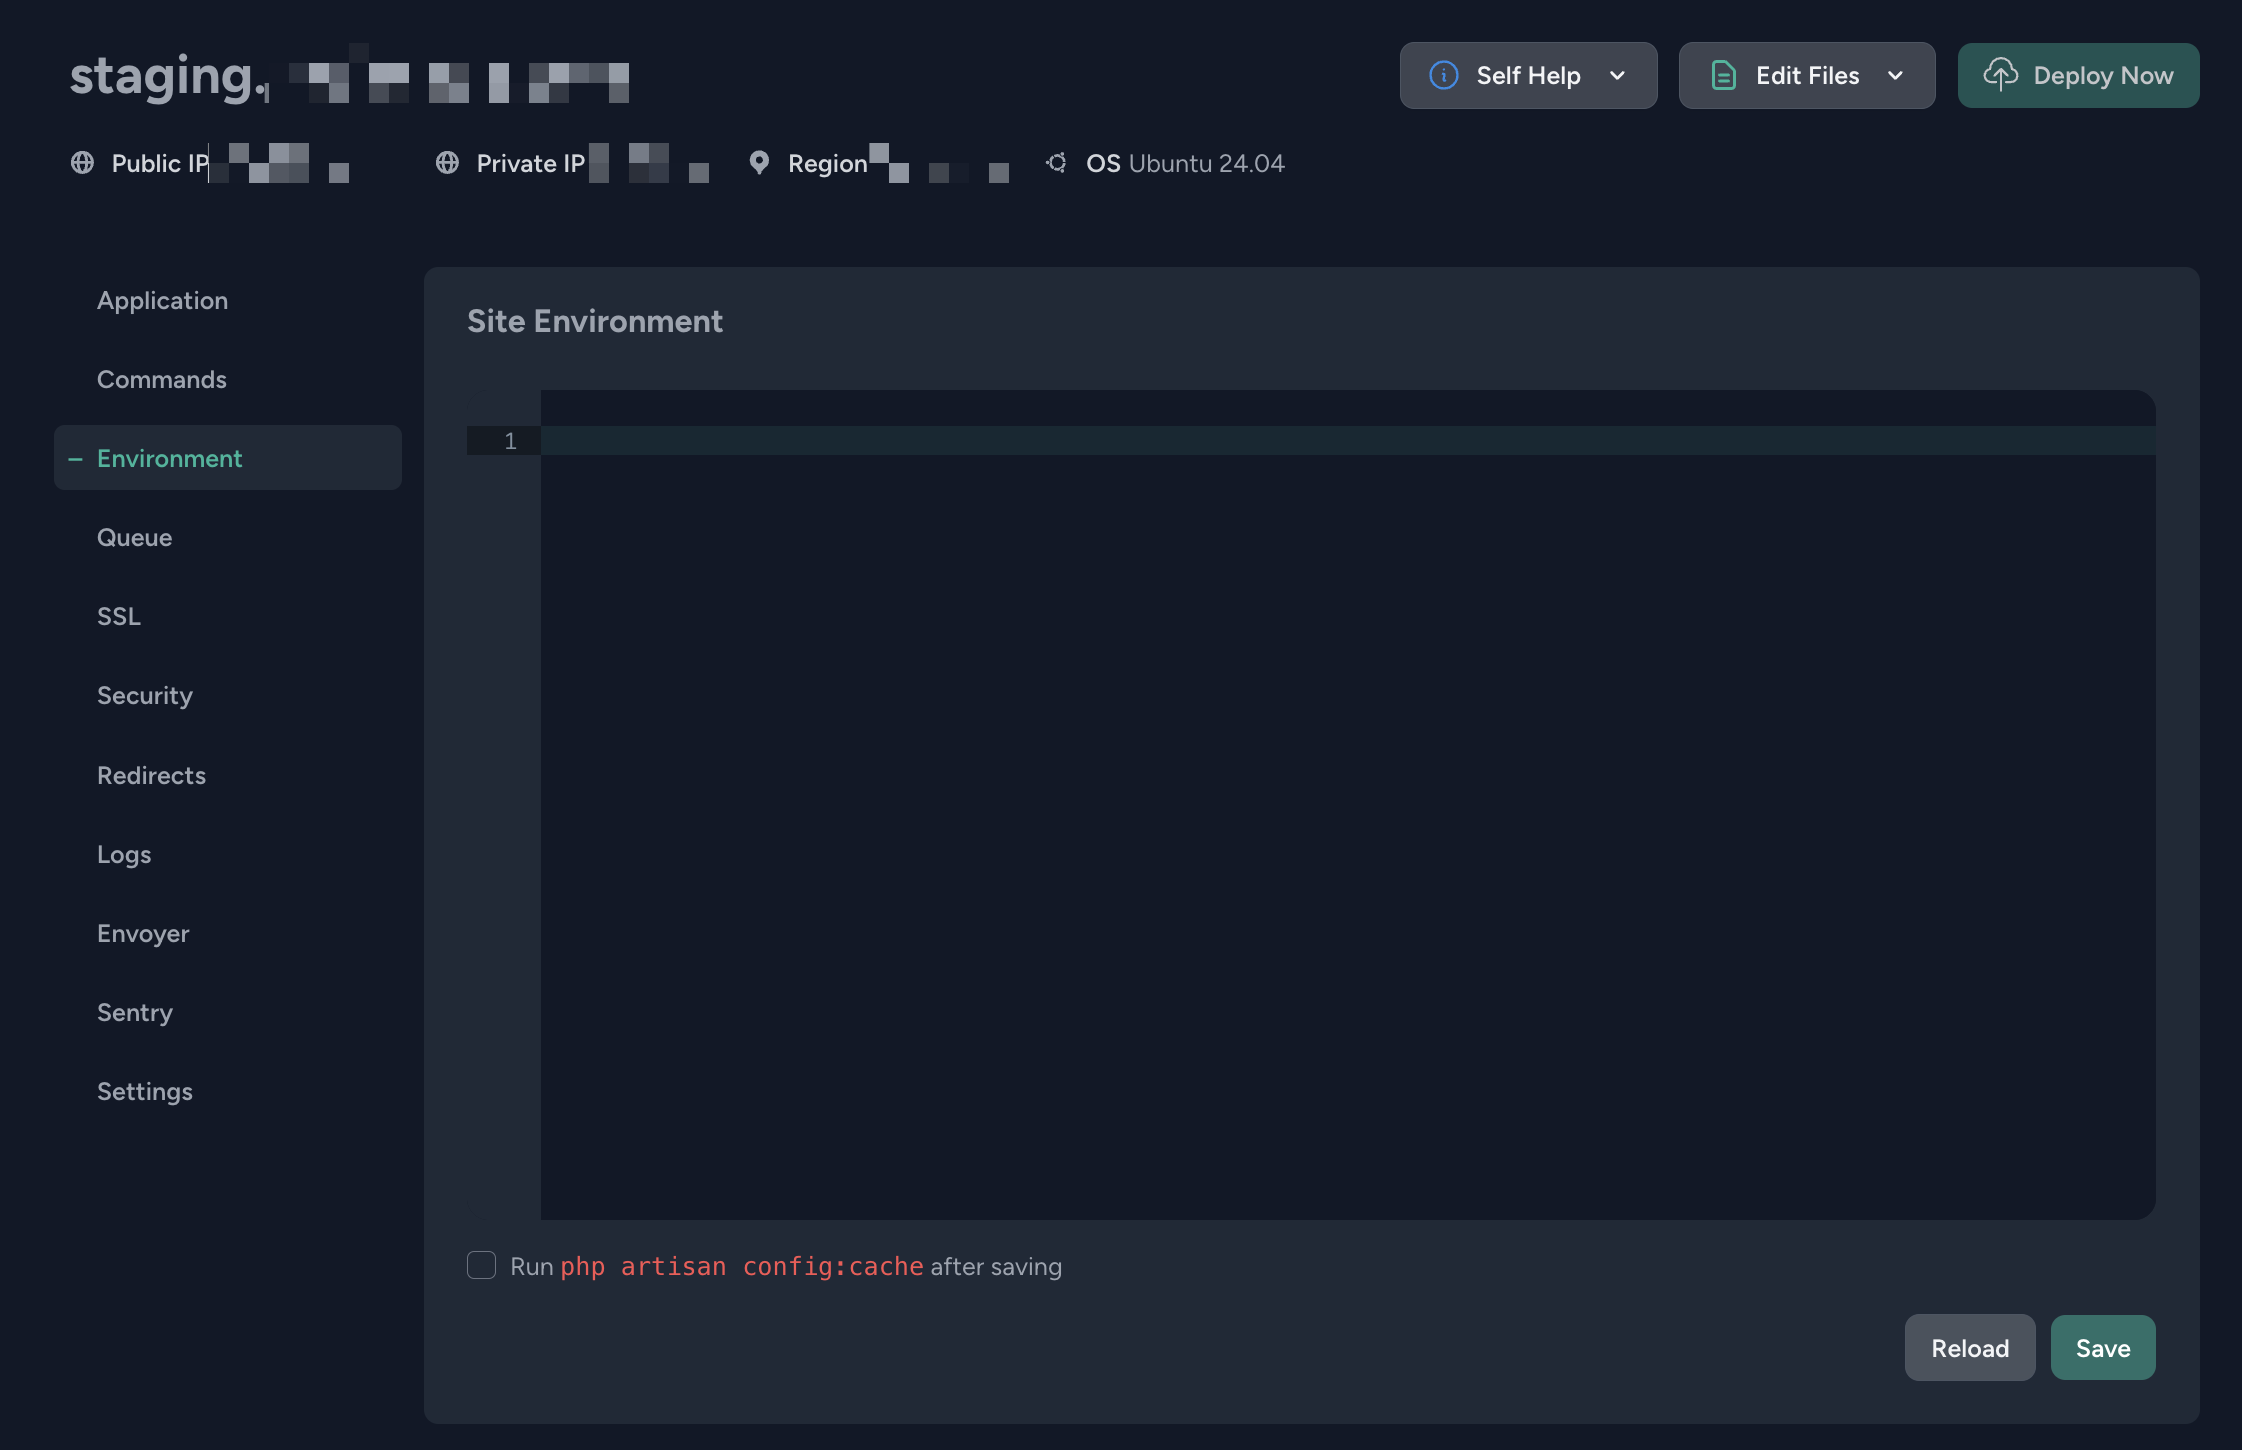
If you're moving a site to a new server - copy the original environment variables over to the new sites environment variables, and make any relevant updates, notably to the database config.
If you're setting a up a new site - set the environment variables based on the sites requirements.
Note that if you're using the fosterstaging domain to test that things are working, ensure that the SITE_URL or CRAFT_SITE_URL are set to that domain and not the primary site domain that's configured in Forge.
Reserved IPs
All sites should have two reserved IPs - One for Production and one for Staging. This makes it easy to switch to new server without worrying about DNS propagation.
Steps to add a new Reserved IP
- Navigate to the Networking page in the Digital Ocean project for the client.
- In that page navigate to the Reserved IPs tab.
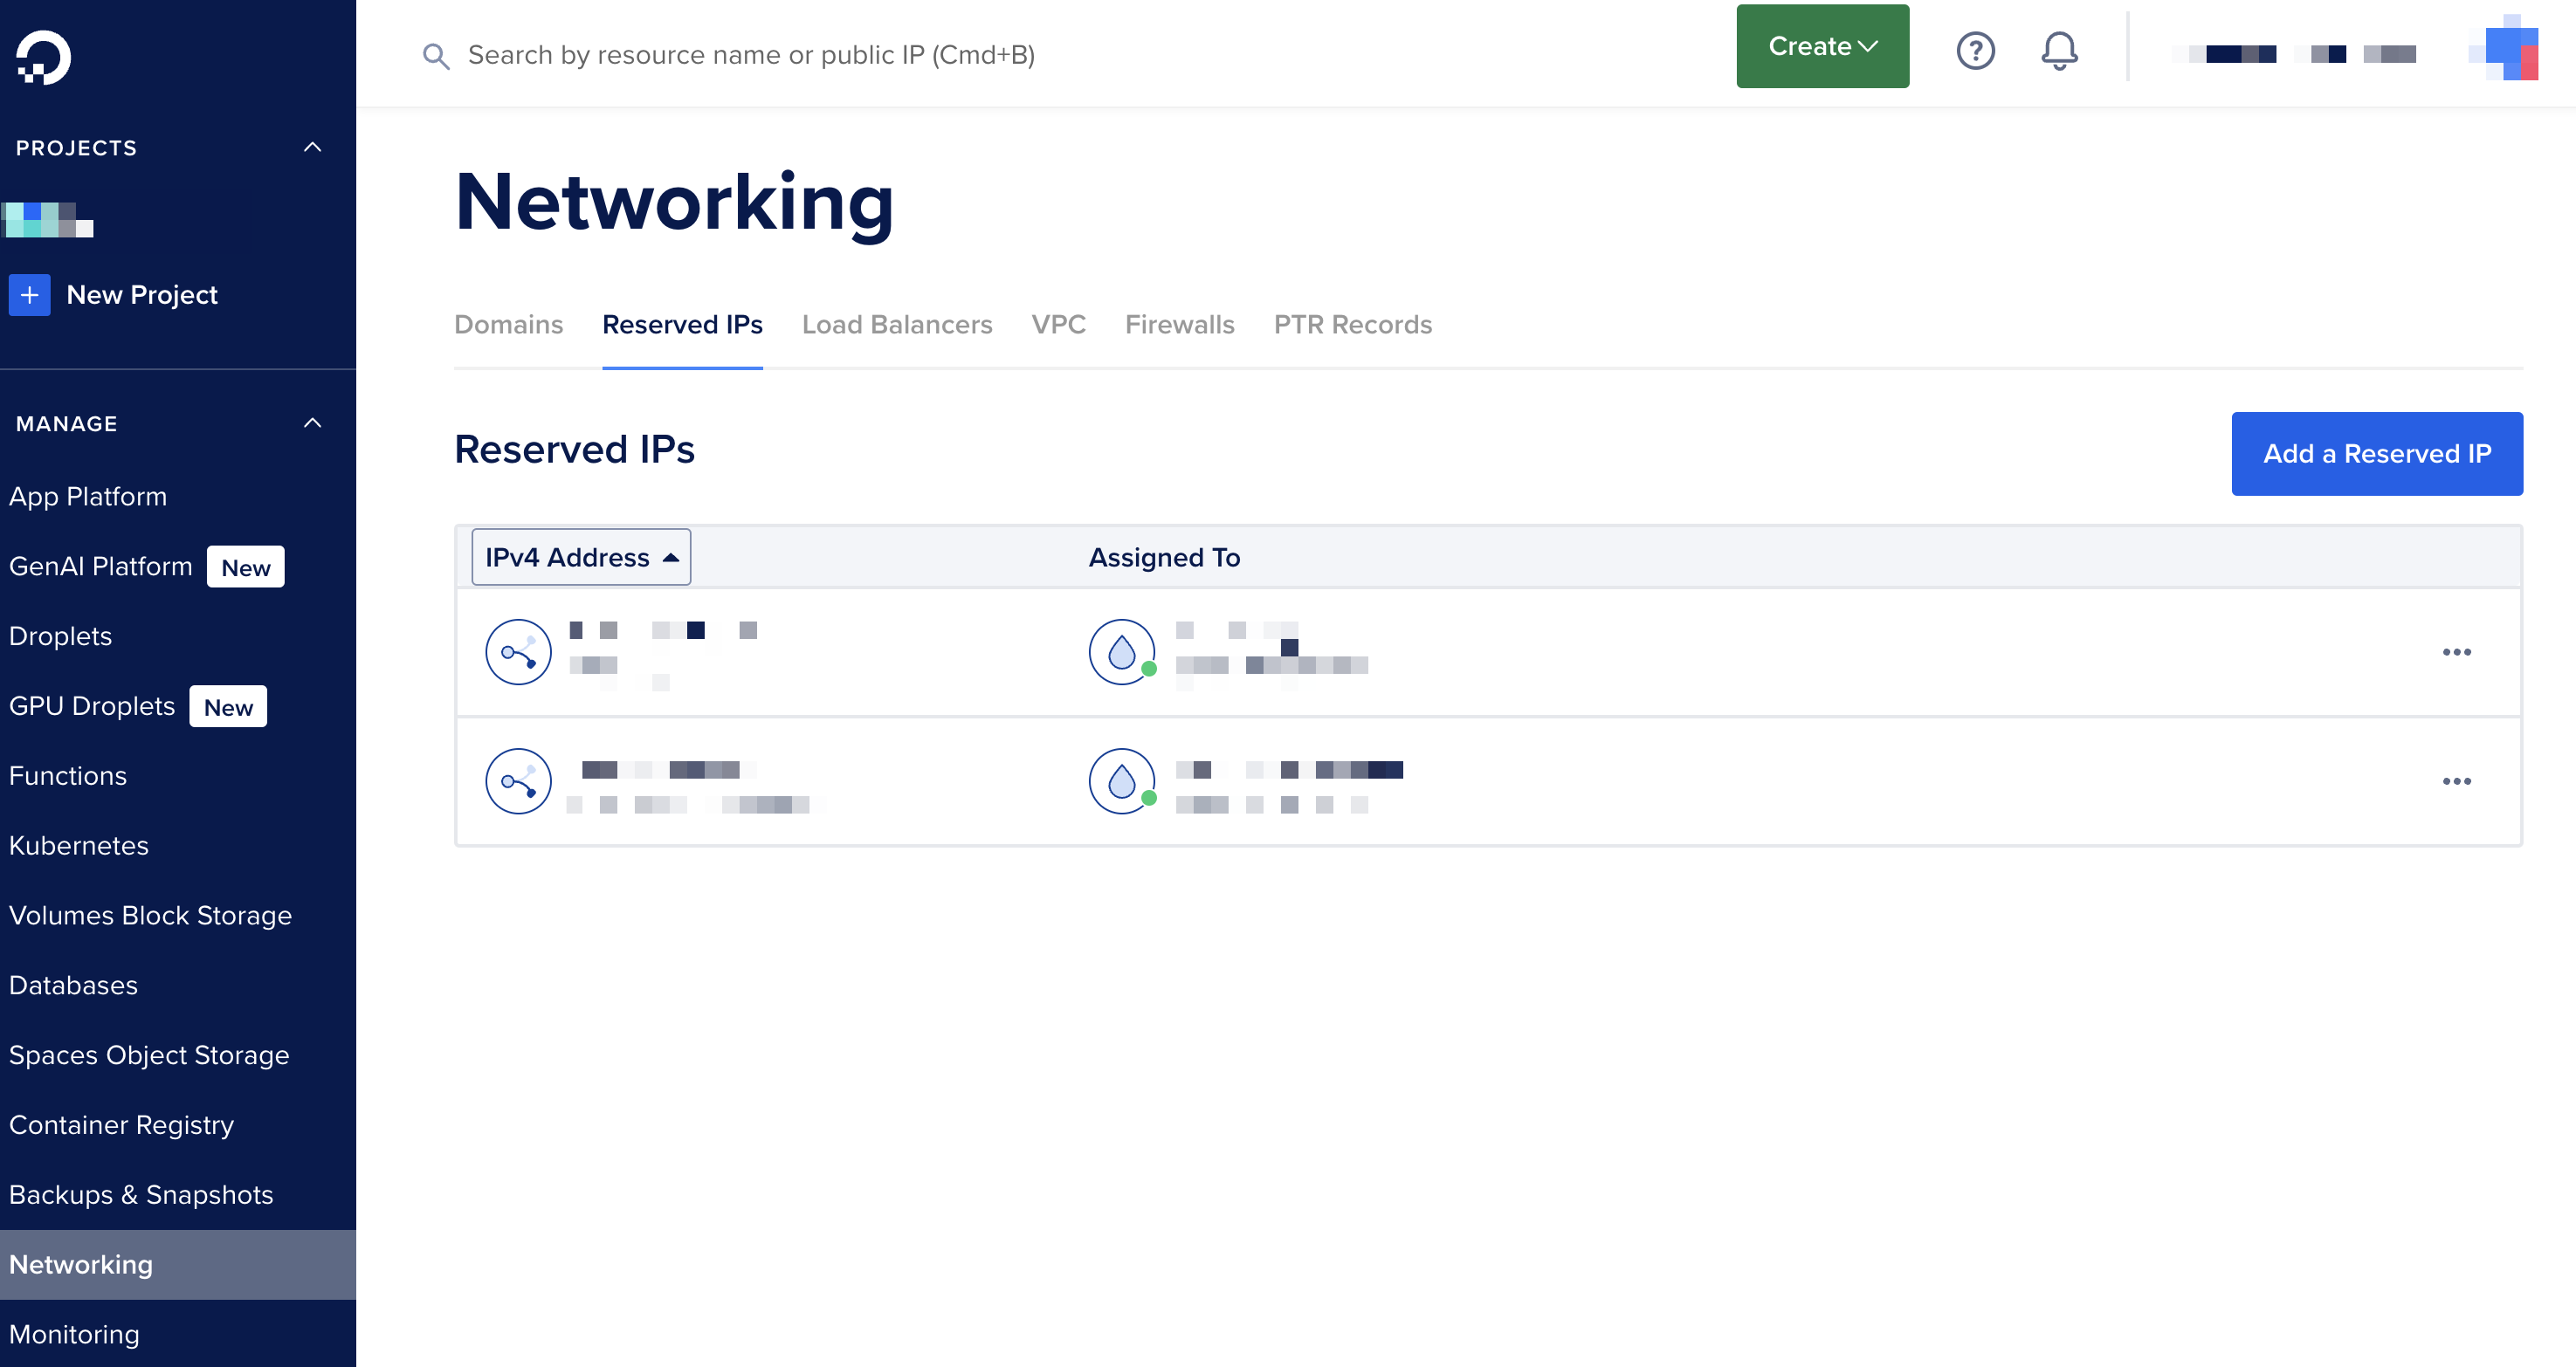
- Click "Add a Reserved IP"
- If you don't have a droplet to assign it to, select "Reserve in Datacenter Region" and choose a region where you'll be creating droplets.
- Submit the form.
- In Bitwarden, add the IP a new custom field in the "Client Name - Digital Ocean" note, call the field "Reserved IP - Production" or "Reserved IP - Staging".
TLS
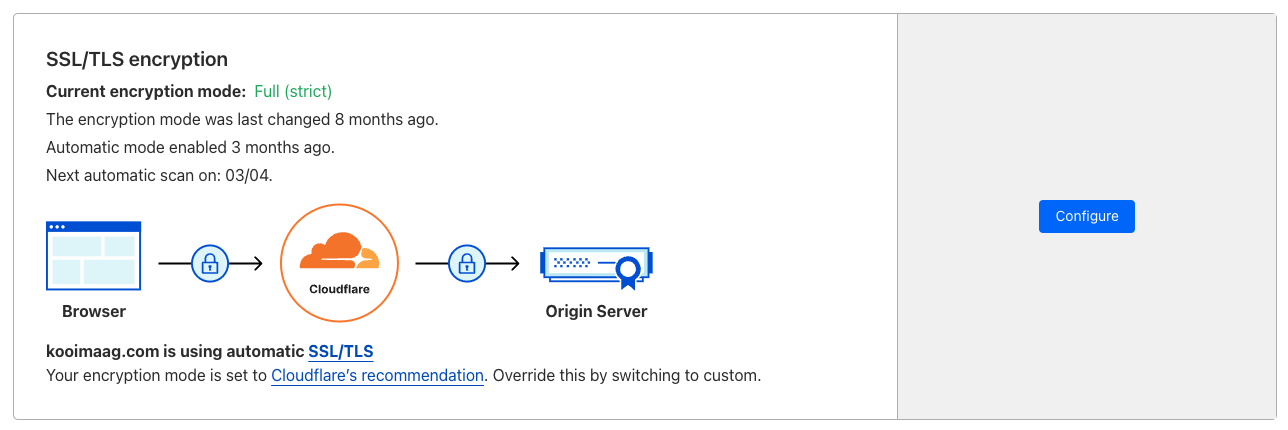
When using CloudFlare for Proxied DNS, we want to ensure that the connection from CloudFlare to our server is encrypted.
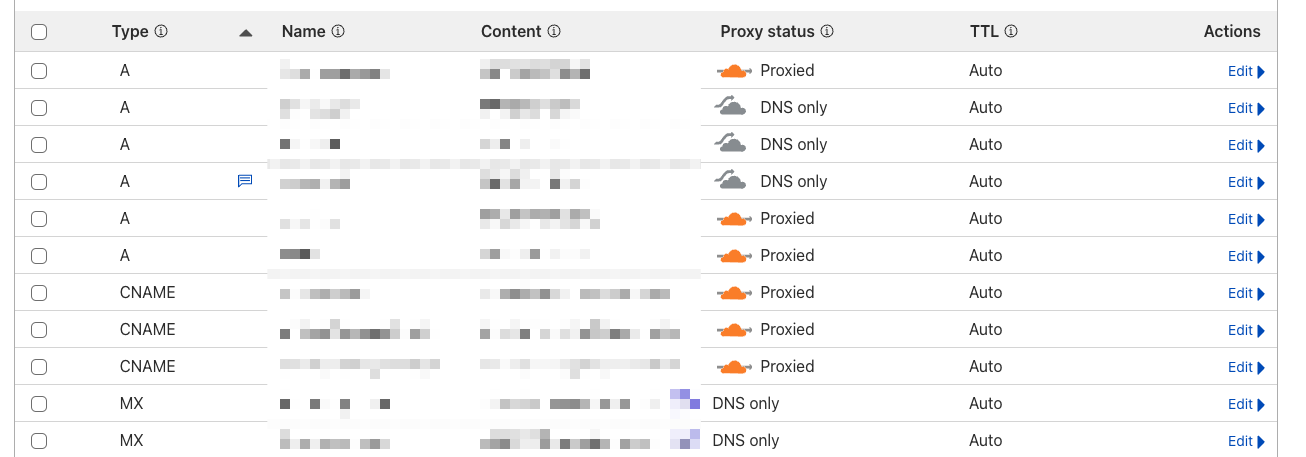
When possible, we prefer Full (strict) mode.
Resources used
Steps to implement strict mode
TODO when I set this up on a server again.
Testing a site configured with an Edge Certificate
When adding a CloudFlare edge certificate to a site, it can be tricky to run the curl command against that site from the command line on the server. This is generally due to the certificate essentially being a "self-signed" certificate.
It's perfect to use and is trusted by CloudFlare. But there's no public trusted chain associated with it.
To get around, this it's possible to tell curl how to work with the certificate correctly.
A regular curl command would look like this and would likely fail:
forge@<server>:~$ curl -k --resolve www.ktparts.com:443:127.0.0.1 https://localhost
curl: (35) OpenSSL/3.0.13: error:0A000458:SSL routines::tlsv1 unrecognized name
Here, even with the -k flag, curl is unable to verify the certificate. This is because the certificate is associated with a specific host name.
We can tell curl how to resolve the host correctly, but spoofing the request to the correct host name.
forge@<server>:~$ curl -k --resolve www.my-site.com:443:127.0.0.1 https://www.my-site.com
Here, we're telling curl that any request to www.my-site.com should be resolved to 127.0.0.1 on port 443.
The -k flag tells curl to ignore the certificate verification errors which it would still have because it's not a public trusted certificate.
Queue Setup
Requires a server to be provisioned.
Resources used
Steps
We generally only run a single instance of the queue listener unless there's a demand for more instances to run.
Note that if we need to run multiple instances of the queue listener, then it's recommended to switch over to Redis for managing the queue. Redis has better locking when there's more than 2 or 3 queue listeners running.
Standard single instance
- On the server's dashboard, navigate to the "Daemons" page.
- Add the queue listener command to the form:
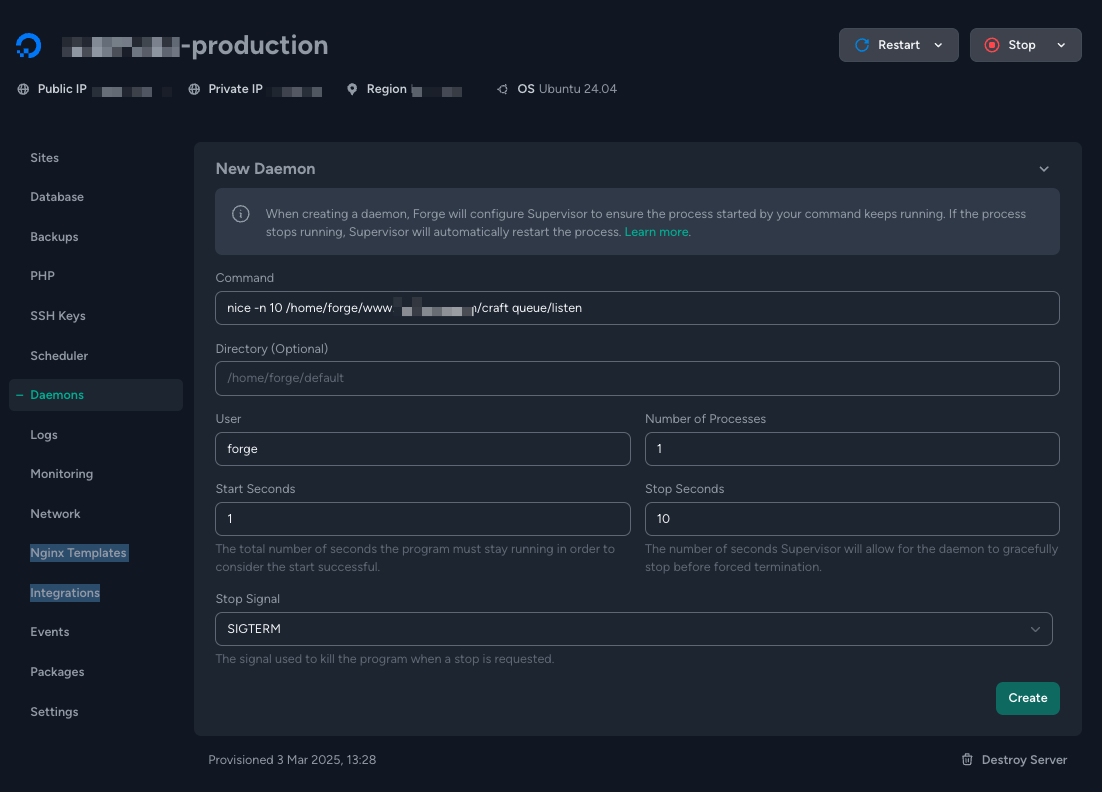
- Command:
nice -n 10 /home/forge/<Site Domain>/craft queue/listen- Example
nice -n 10 /home/forge/www.fostercommerce.com/craft queue/listen
- Example
- Directory: Leave blank
- User:
forge - Number of processes:
1 - Start Seconds:
1 - Stop Seconds:
10 - Stop Signal:
SIGTERM
- Command:
- Click "Create"
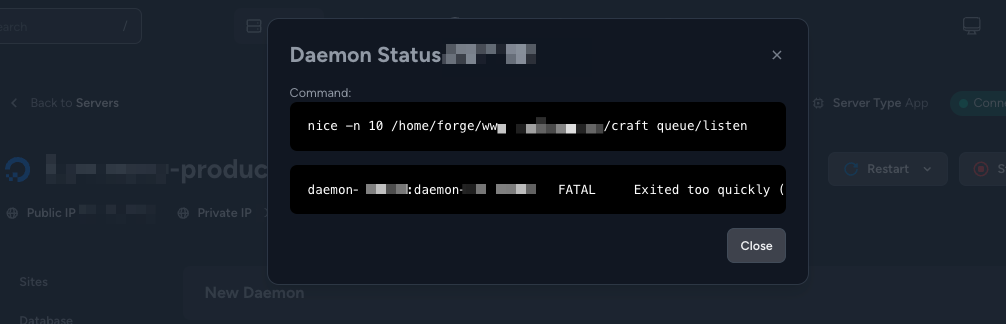
- Note that if we haven't setup deployments yet, then the queue listener daemon will be in a failed state. This is fine for now.
PHP
PHP Configuration
Requires a server to be provisioned.
Resources used
Basic Configuration

- Navigate to the PHP page for the server
- Ensure OPCache is enabled
- Set Max File Upload Size to
50M. Click "Update". - Set the Max Execution Time to
30. Click "Update".
PHP FPM Configuration

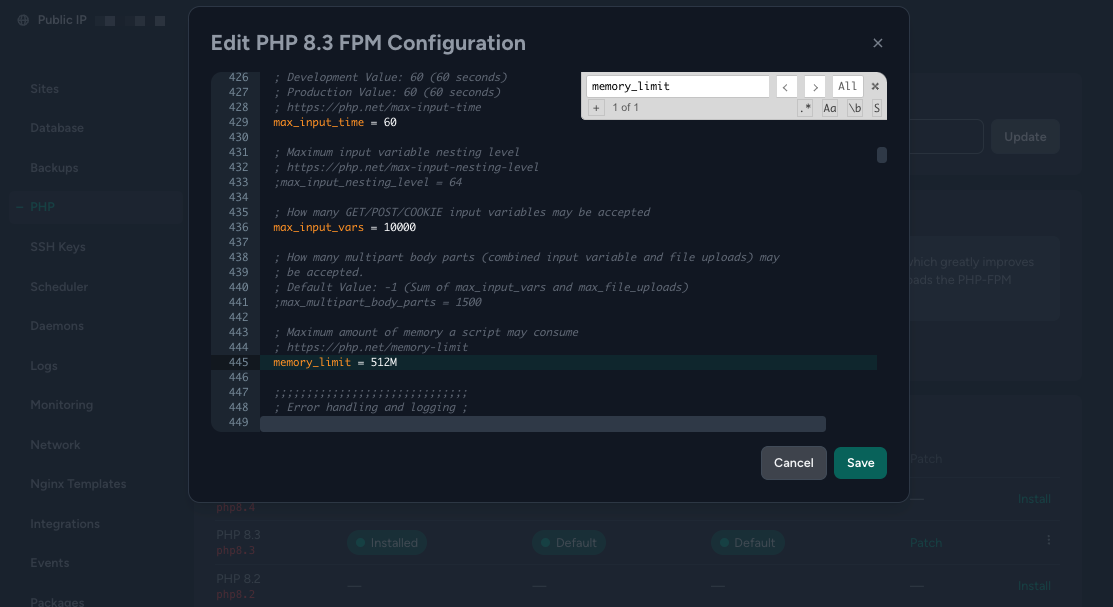
- Load up the PHP FPM config from the PHP versions hamburger menu
- Set
max_input_varsto10000 - Set
memory_limitto512M
- Set
- Click "Save"
PHP Pool Configuration


- Load up the PHP pool configuration from the PHP versions hamburger menu.
- Locate the process manager section (pm) and replace the defaults with the following:
pm = dynamic pm.max_children = 40 pm.start_servers = 10 pm.min_spare_servers = 10 pm.max_spare_servers = 20- These are safe defaults which work fairly well for our baseline 4vCPU server setup.
- Click "Save"
GitHub Workflows
Our standard deployments use a release-based deployment strategy.
Workflow structure
All site repositories should include a .github/workflows directory with the following files
.github/workflows
├── ci.yaml
├── deploy-production.yaml
├── deploy-staging.yaml
└── deploy.yaml
Deployments
Both staging and production workflows allow a specific ref to be used to deploy from via a manual workflow_dispatch trigger.
This allows engineers to deploy a previous tag, commit or branch.
This is useful in cases where hotfixing is required to get something to production quickly, for example.
Staging
All work commited through Pull Requests to main are deployed to staging.
The deploy-staging.yaml workflow handles this.
Production
Once a production deployment is required, engineers must create a new release. This is typically done by navigating to https://github.com/FosterCommerce/
On the new release page
- Choose a tag - This should be in the format YYYY-MM-DD.X
- Which represents the current date and the current number of the deployment for the day.
- For example,
2024-09-19.1
- Ensure that you click "Create a new tag: ..." to tell GitHub that you want to create that tag
- Set the release title to be the same as the tag
- Click "Generate release notes" which tells GitHub to generate release documentation based on all Pull Requests since the last release.
- Click "Publish" to create the release and trigger a production deployment.
Deployment configuration
Deployments are configured in GitHub in two places:
- In the Environments settings page (https://github.com/FosterCommerce/
/settings/environments) 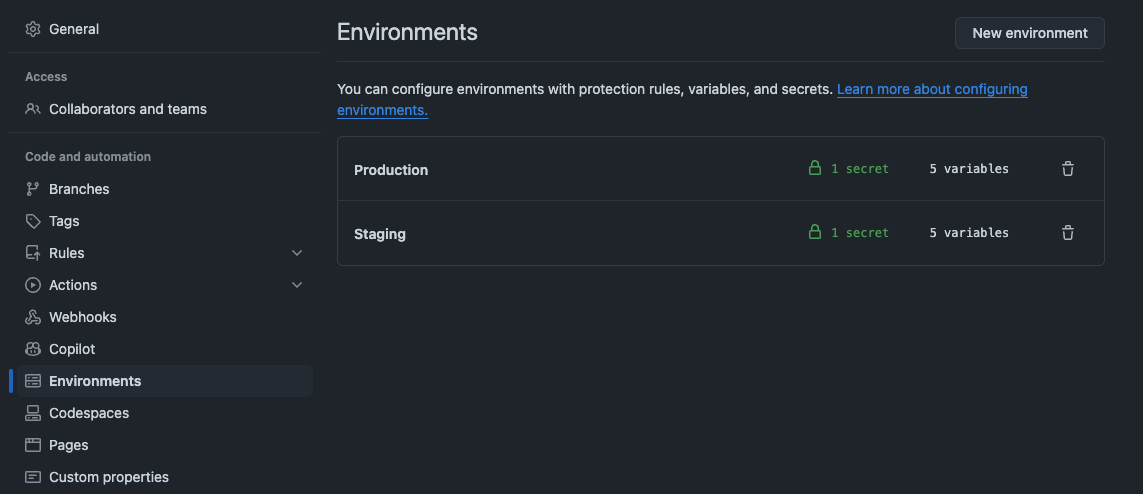
- And in the Actions Secrets and Variables page (https://github.com/FosterCommerce/
/settings/secrets/actions) 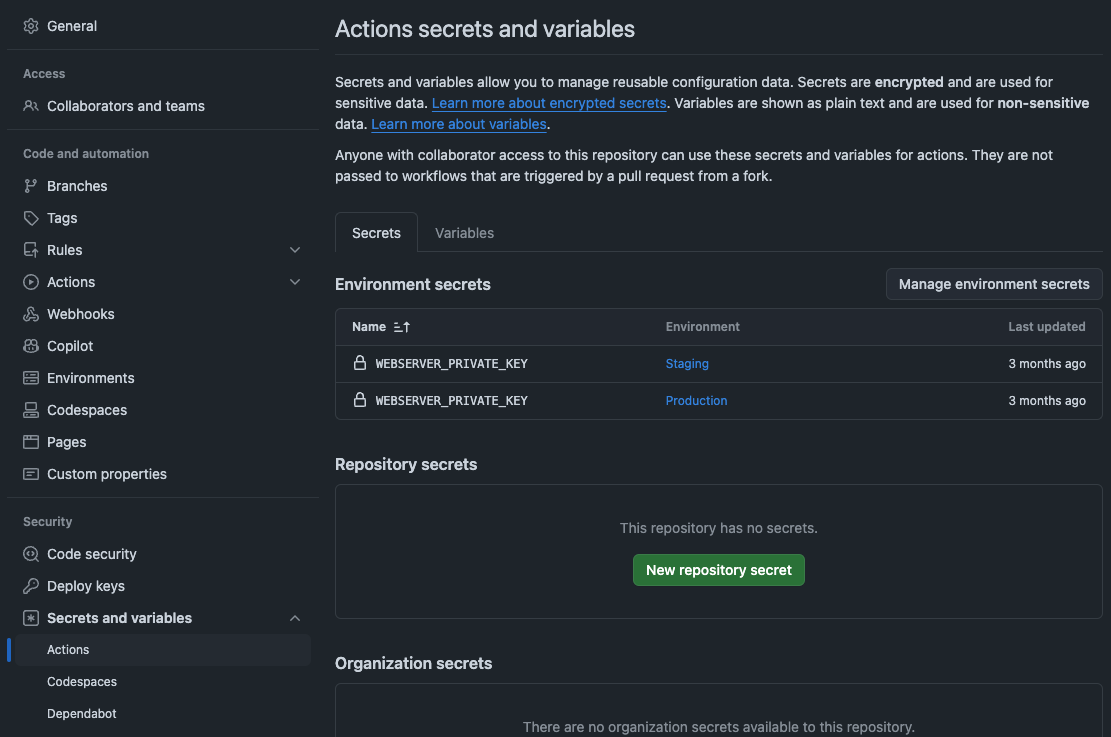
Environment configuration
Deployments use GitHub's Environments feature. Because of this, we require two environments to be configured for each site, Production and Staging.
Standard deployments require the following secrets and variables:
Secrets
WEBSERVER_PRIVATE_KEY- Private key used by SSH for copying files over onto the server and to run any deployment scripts.
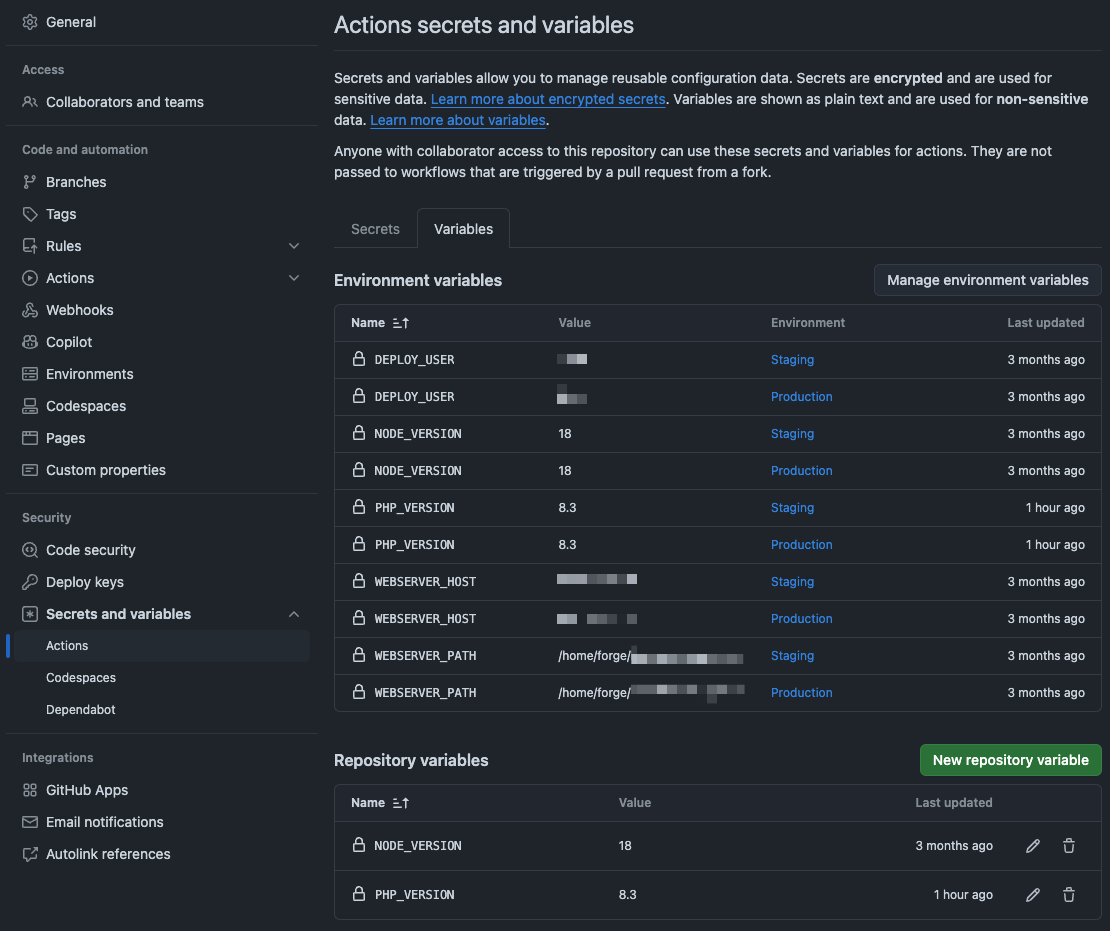
Variables
DEPLOY_USER- The SSH user use by SSH for copying files and running scripts on the server. This is generally the defaultforgeuser for Forge provisioned sites.NODE_VERSION- The version of node to be used when runningnpm run build.PHP_VERSION- The version of PHP to use when runningcomposer install.WEBSERVER_HOST- The hostname/ip address of the server where we'll be copying files.- Important: This is not the reserved IP assigned to the server. This must be the servers actual IP. Otherwise it makes it can make it difficult to set up a new server without pointing the reserved IP at the new server.
WEBSERVER_PATH- The path where files should be copied. This is generally/home/forge/<site host>, for example/home/forge/www.mysite.com.
Actions secrets and variables
This will generally only have fallback variables used for CI where there is no environment.
Variables
NODE_VERSION- The version of node to be used when runningnpm run build.PHP_VERSION- The version of PHP to use when runningcomposer install.
Updating deployment configuration
When a new server has been provisioned for either staging or production (or both), the relevant variables need to be updated to.
For example, if we had www.mysite.com at 192.168.1.10, and we created a new server, at 192.168.1.17, that deployments need to target, we can update the WEBSERVER_HOST for the Production environment to point at 192.168.1.17.
The same applies when upgrading PHP versions. If we upgrade the PHP version in forge by installing a newer PHP version, then we need to set that version for the specific environment in GitHub.
Continuous Integration
Our typical ci.yaml workflow runs PHPStan, ECS and Rector to ensure code quality standards.
On projects with JS-based frontends or which rely on frameworks such as Alpine.js, the CI workflow will also include checks for ESLint and Prettier.
The CI workflow typically only requires the NODE_VERSION and PHP_VERSION actions variables.
Database
Database MariaDB to MySQL Migration
Requires a server to be provisioned.
Resources used
Migrating to a new server
If we've set up a new server for a site with the plans of migrating the site over to it, we'll need to migrate the database over too.
Notes for production environments
When migrating the database of a production environment, we need to implement a content freeze for the website so that we can ensure that we don't miss anything when copying the data across.
However, this isn't always possible. A potentially better solution would be to have some way to turn on maintenance mode instead so that we can guarantee that we're not losing any data. verbb/patrol offers something like this.
Migration steps
- SSH into the original server
- Dump the .env config so that it's quick to reference the credentials:
> cat <site host>/.env | grep DB_ DB_DRIVER="mysql" DB_SERVER="localhost" DB_USER="forge" DB_PASSWORD="<redacted>" DB_DATABASE="<redacted>" DB_TABLE_PREFIX="" DB_PORT="3306" - Run
mysqldumpwith the creds above and gzip it when it's done:mysqldump -uforge -p dbname > site-environment-20250303.sql gzip site-environment-20250303.sql exitfrom the SSH session andscpthe file from the original server to the new one:scp original-server:./mysite-staging-20250303.sql.gz new-server:./sshinto the new server and decompress the gz file:gzip -d mysite-staging-20250303.sql.gz- Then restore the sql using a similar approach to before:
cat site-domain/.env | grep DB_
mysql -uforge -p dbname < mysite-staging-20250303.sql
Converting the database
Sometimes it's not possible to import a MariaDB database dump into a MySQL instance. Follow these steps to perform the migration and conversion to MySQL.
- Follow steps 1 - 3 in Migration steps
exitfrom the SSH session andscpthe file from the original server to the new one:scp original-server:./mysite-staging-20250303.sql.gz /path/to/local/dir/- In your project dir ensure that you're using a MariaDB database for ddev, and then import the database
ddev import-db --file /path/to/local/dir/mysite-staging-20250303.sql.gz - Let ddev convert the database
ddev debug migrate-database mysql:8.0 - Export the database again
ddev export-db --file /path/to/local/dir/mysite-staging-20250303-mysql.sql.gz - Copy the file onto the server
scp /path/to/local/dir/mysite-staging-20250303-mysql.sql.gz new-server:./ sshinto the new server and decompress the gz file:gzip -d mysite-staging-20250303-mysql.sql.gz- Then restore the sql using a similar approach to before:
cat site-domain/.env | grep DB_
mysql -uforge -p dbname < mysite-staging-20250303-mysql.sql
Database Backups
Resources used
Requirements
- Backups run 4x daily
- Backups are saved to DigitalOcean Spaces
- We keep at least 14 days worth of backups, 56 backup files
Configuring Forge Backups
- Navigate to your server in Laravel Forge.

- If it's not already showing, open the "New Backup Configuration" panel.
- Capture the following details:

- Frequency:
Custom - Custom Frequency:
15 */6 * * * - Provider:
DigitalOcean Spaces - Region: Choose a region closest to the client/resources
- Bucket: Enter the bucket name for the project
- Access key:
access key in Bitwarden - Secret key:
secret key in Bitwarden - Storage directory:
db-backups/ - Backup retention:
56 - Notification email: FC Engineering email address
- Databases: Select the production DB from the list
- Frequency:
- Click "Save"
- Once the configuration has been saved, test that it works by clicking "Run".

Restore from a Backup
In the event we need to restore from a backup, here are the steps to do so:
- Navigate to the "Backups" section on your server in Laravel Forge.
- You will see a list of "Recent Backups". These are the automated backups that have been made
- Click the "Restore" link for the database backup in the list you want to restore

- You will see a confirmation modal telling you this action cannot be undone. Click "Yes" to start the restore process
- Once it has completed, depending on the database size you may need to wait a few minutes for database to fully be restored.
Note: Once the restore has completed, you may need to clear out Craft's "Data caches" if you are still seeing cached data in the CP.
Database Timezone Configuration
Reference
- https://craftcms.com/knowledge-base/populating-mysql-mariadb-timezone-tables
- https://dev.mysql.com/doc/refman/8.0/en/time-zone-support.html#time-zone-installation
Confirm timezones are configured
Craft will flag this as a log message or in the System Report page in the Utilities section in the Control Panel.
Alternatively, you can confirm directly on the server.
SSH onto the relevant server and run the following command:
mysql -uforge -p -e "SELECT COUNT(*) FROM mysql.time_zone_name"
Enter the password for the forge user. This should be stored in Bitwarden.
The output should look something like this if timezones are not configured:
forge@ktp-prod-next:~$ mysql -uforge -p -e "SELECT COUNT(*) FROM mysql.time_zone_name"
Enter password:
+----------+
| COUNT(*) |
+----------+
|        0 |
+----------+
If they are correctly configured, the output should look something like this:
forge@ktp-prod-next:~$ mysql -uforge -p -e "SELECT COUNT(*) FROM mysql.time_zone_name"
Enter password:
+----------+
| COUNT(*) |
+----------+
|      499 |
+----------+
Configuring timezones for MySQL
SSH onto the relevant server and run the following command:
mysql_tzinfo_to_sql /usr/share/zoneinfo | mysql -uforge -p mysql
When prompted, enter the password for the forge user. This should be stored in Bitwarden.
The output should look something like this:
forge@<server>:~$ mysql_tzinfo_to_sql /usr/share/zoneinfo | mysql -u forge -p mysql
Enter password:
Warning: Unable to load '/usr/share/zoneinfo/iso3166.tab' as time zone. Skipping it.
Warning: Unable to load '/usr/share/zoneinfo/leap-seconds.list' as time zone. Skipping it.
Warning: Unable to load '/usr/share/zoneinfo/leapseconds' as time zone. Skipping it.
Warning: Unable to load '/usr/share/zoneinfo/tzdata.zi' as time zone. Skipping it.
Warning: Unable to load '/usr/share/zoneinfo/zone.tab' as time zone. Skipping it.
Warning: Unable to load '/usr/share/zoneinfo/zone1970.tab' as time zone. Skipping it.
Warning: Unable to load '/usr/share/zoneinfo/zonenow.tab' as time zone. Skipping it.
It's safe to ignore the warnings, but still a good idea to confirm that timezone support is configured correctly but running the SQL mentioned above.
MySQL Optimization
TODO add notes about using mysqltuner
Digital Ocean Spaces
TODO
Redis
- TODO - update to include any 3rd party recommendations
- Maximum Memory
- Maximum Memory Policy
- Applying the changes without downtime
- Applying changes with downtime
We generally use Redis for our caching layer.
TODO - update to include any 3rd party recommendations
Maximum Memory
Setting the maxmemory directive in the Redis configuration file will limit the amount of memory that Redis can use.
This is useful for preventing Redis from using too much memory and starving other services of resources.
The default value is 0, which means that Redis will use as much memory as possible.
If the site is using large amounts of memory for caching, for instance, when we have sites with a lot of content, where each content page can potentially be cached, we may need to set this value.
A good baseline is to set this value to 40% of the total memory available on the server. This gives us a good amount left over for PHP and MySQL.
Note that you should look at how much memory is available on the server and how much you can afford to allocate to Redis.
Configuration
The configuration file is located at /etc/redis/redis.conf.
- Open the configuration file in your preferred text editor.
sudo vim /etc/redis/redis.conf - Find the
maxmemorydirective and set it to the desired value.- If the directive doesn't exist, find the commented out version of it, and add it below that.
- Save the file and exit the text editor.
Example
# 40% of 8GB is 3.2GB
maxmemory 3gb
Maximum Memory Policy
The maxmemory-policy directive in the Redis configuration file will determine what happens when Redis reaches the maxmemory limit.
If we're setting a maxmemory limit, we should also set a policy to determine what happens when this limit is reached, our recommended policy is allkeys-lru.
This will remove the least recently used keys from Redis when the maxmemory limit is reached.
Configuration
- Open the configuration file in your preferred text editor.
sudo vim /etc/redis/redis.conf - Find the
maxmemory-policydirective and set it to the desired value.- If the directive doesn't exist, find the commented out version of it, and add it below that.
- Save the file and exit the text editor.
Example
maxmemory-policy allkeys-lru
Applying the changes without downtime
It is possible to apply configuration changes to Redis without downtime.
Instead of restarting the Redis service, we can use the CONFIG SET command to apply the changes.
- On your server, login to Redis
redis-cli - Apply the changes
CONFIG SET maxmemory 3gb CONFIG SET maxmemory-policy allkeys-lru - Verify the changes
CONFIG GET maxmemory
CONFIG GET maxmemory-policy
Applying changes with downtime
Restart the Redis service to apply the changes.
sudo systemctl restart redis
Meilisearch Set Up
Setting up the plugin
In your local dev environment, install the Meilisearch Connect plugin
Setting up in DDEV
Install Meilisearch
We need to configure DDEV to create a Meilisearch container when we run it for the site. To do this, create the following file in .ddev/docker-compose.meilisearch.yaml
NOTE that the version of Meilisearch used in this docker compose snippet is likely outdated and the latest version supported by our plugin should be used instead.
version: '3.6'
services:
  meilisearch:
	container_name: ddev-${DDEV_SITENAME}-meilisearch
	image: getmeili/meilisearch:v1.11.1
	hostname: ${DDEV_SITENAME}-meilisearch
	expose:
	  - "7700"
	environment:
	  - VIRTUAL_HOST=$DDEV_HOSTNAME
	  - HTTP_EXPOSE=7700:7700
	  - MEILI_MASTER_KEY=meilisearchlocal
	  - MEILI_ENV=development
	volumes:
	  - type: "volume"
		source: meilisearch
		target: "/data.ms"
		volume:
		  nocopy: true
	  - type: "bind"
		source: "."
		target: "/mnt/ddev_config"
	  - ddev-global-cache:/mnt/ddev-global-cache
	labels:
	  com.ddev.site-name: ${DDEV_SITENAME}
	  com.ddev.approot: ${DDEV_APPROOT}
  web:
	links:
	  - meilisearch:meilisearch

volumes:
  meilisearch:
Once you have created that file, restart DDEV
ddev restart
Create environment variables
Create the following environment variables in your project
MEILI_HOST_URL="http://YOUR_DDEV_DOMAIN:7700"
MEILI_ADMIN_API_KEY="meilisearchlocal"
MEILI_SEARCH_API_KEY="meilisearchlocal"
You'll also need to create variables for your required indexes. These will be used within the Meilisearch Connect config file. For example;
MEILI_PAGES_INDEX="pages"
MEILI_OER_INDEX="oer"
MEILI_PEARL_INDEX="pearl"
Create the Index config
Refer to the Meilisearch Connect documentation
Run the sync command
Before you can access the CP utility or do anything with Meilisearch Connect, you will need to sync the Meilisearch settings. Run the following command
ddev craft meilisearch-connect/sync/settings
Setting up a Staging instance
Create a Forge App
For the Staging instance we want to create an empty app within Forge. This can be done on the same server that the Staging site is running on.
- Log in to Forge.
- Locate the staging server for the site you are working on.
- Click "New Site"
- Add the domain, for consistency with our other sites use search-staging.example.com (CloudFlare doesn't like nested subdomains)
- Project type should be PHP/Laravel/Symfony
- The Web Directory doesn't really matter
- PHP Version should be 8.3+
- There is no need to create a database or do anything else
- Click Add Site to create the site
- Create an SSL certificate for the site within Forge
There is no need to configure anything else on this server. We will do the rest via the command line
Install Meilisearch
Next you will need to SSH into that Forge App and install Meilisearch. You can refer to the following instructions (even though this isn't for Production) https://www.meilisearch.com/docs/guides/running_production
Follow steps 1-4. There is no need to do any more for the staging instance.
You'll need to use sudo to create the service. The sudo password for the server should be recorded in Bitwarden.
When Meilisearch starts it will generate a master key. It is important to make a note of this in Bitwarden for future reference. You will need it later.
Configure a domain for Meilisearch
We then configure a domain name to point at that app. You may need to do this within Cloudflare if that's being used for the site. Add an A record pointing at search-staging for the staging domain.
Set up environment variables
In your Craft .env file, create environment variables for the API keys. For the purposes here we can use the same key for both Admin and Search API Keys.
MEILI_ADMIN_API_KEY="MASTERKEY"
MEILI_SEARCH_API_KEY="MASTERKEY"
Update Forge nginx config
Update your site's Nginx config file,
Test the Meilisearch instance
You should now be able to visit the Meilisearch staging domain in your browser and see the GUI
Setting up a Production instance
As above but with additional steps for the installation of Meilisearch
Reverting a Release
If, after creating a Release, you need to revert back to a previous state it's possible to do so.
-
Go to the repo in GitHub
-
Go to Actions and select the appropriate deployment action (i.e. deployment/production)
-
Click the "Run Workflow" button

-
Select the branch from which you wish to deploy (this should be Main)
-
Enter a ref that identifies the repo state you wish to deploy. The ref input can be;
- a commit hash like 0f7eee42a58e56978cfa9066a0667b5aa6ada7a6
- a branch name like refs/heads/main
- a tag like refs/heads/2025-06-25
tmux Session
A tmux session on a remote server is useful for maintaining persistent terminal sessions that can be detached and reattached later without losing the state of running processes.
An example use-case is running Craft's resave/all command, which can take potentially very long to complete.
Usage
Run the following in an SSH session on the remote server:
tmux new -A -s <session-name>
For example:
tmux new -A -s resave-all
This will create a new session called resave-all if one doesn't already exist. Once created, or it already exists, tmux will attach to that session.
You'll be able to identify that you're in a session by the (normally) green status bar at the bottom of the terminal which would show something like this:
[resave-all0:bash*
The status bar shows the session name and the currently active command being run.
Once inside the tmux session, you can run any commands as normal. For example:
./craft resave/all
Detaching from the session
To detach from a tmux session and leave it running in the background on the server, press Ctrl + b, then release both keys and then immediately press d.
Reattaching to the session
You can use the same command as above to reattach to the session:
tmux new -A -s <session-name>
The -A flag will ensure that if the session already exists, it will simply attach to it.
Closing the session
Ctrl + d exists the session, or alternatively you can type exit and press enter.
Redirect-only or proxy site Setup
Requires a server to be provisioned.
Resources used
When is this necessary
If the domain is not managed by CloudFlare, and you need to redirect from one domain to another, or you need to proxy to another service or server.
Steps
- On the site in Forge which you'd like to have a domain redirect to, navigate to the Domains tab
- Update existing content-serving sites
- The primary site, and any secondary sites need to have this change
- For example, Crawford Hoying has a single Craft install with multiple sites. Custom domains all use the same Craft install.
- At the top of the Domains page, click "Edit Nginx configuration"
- Switch to the config file for the main site

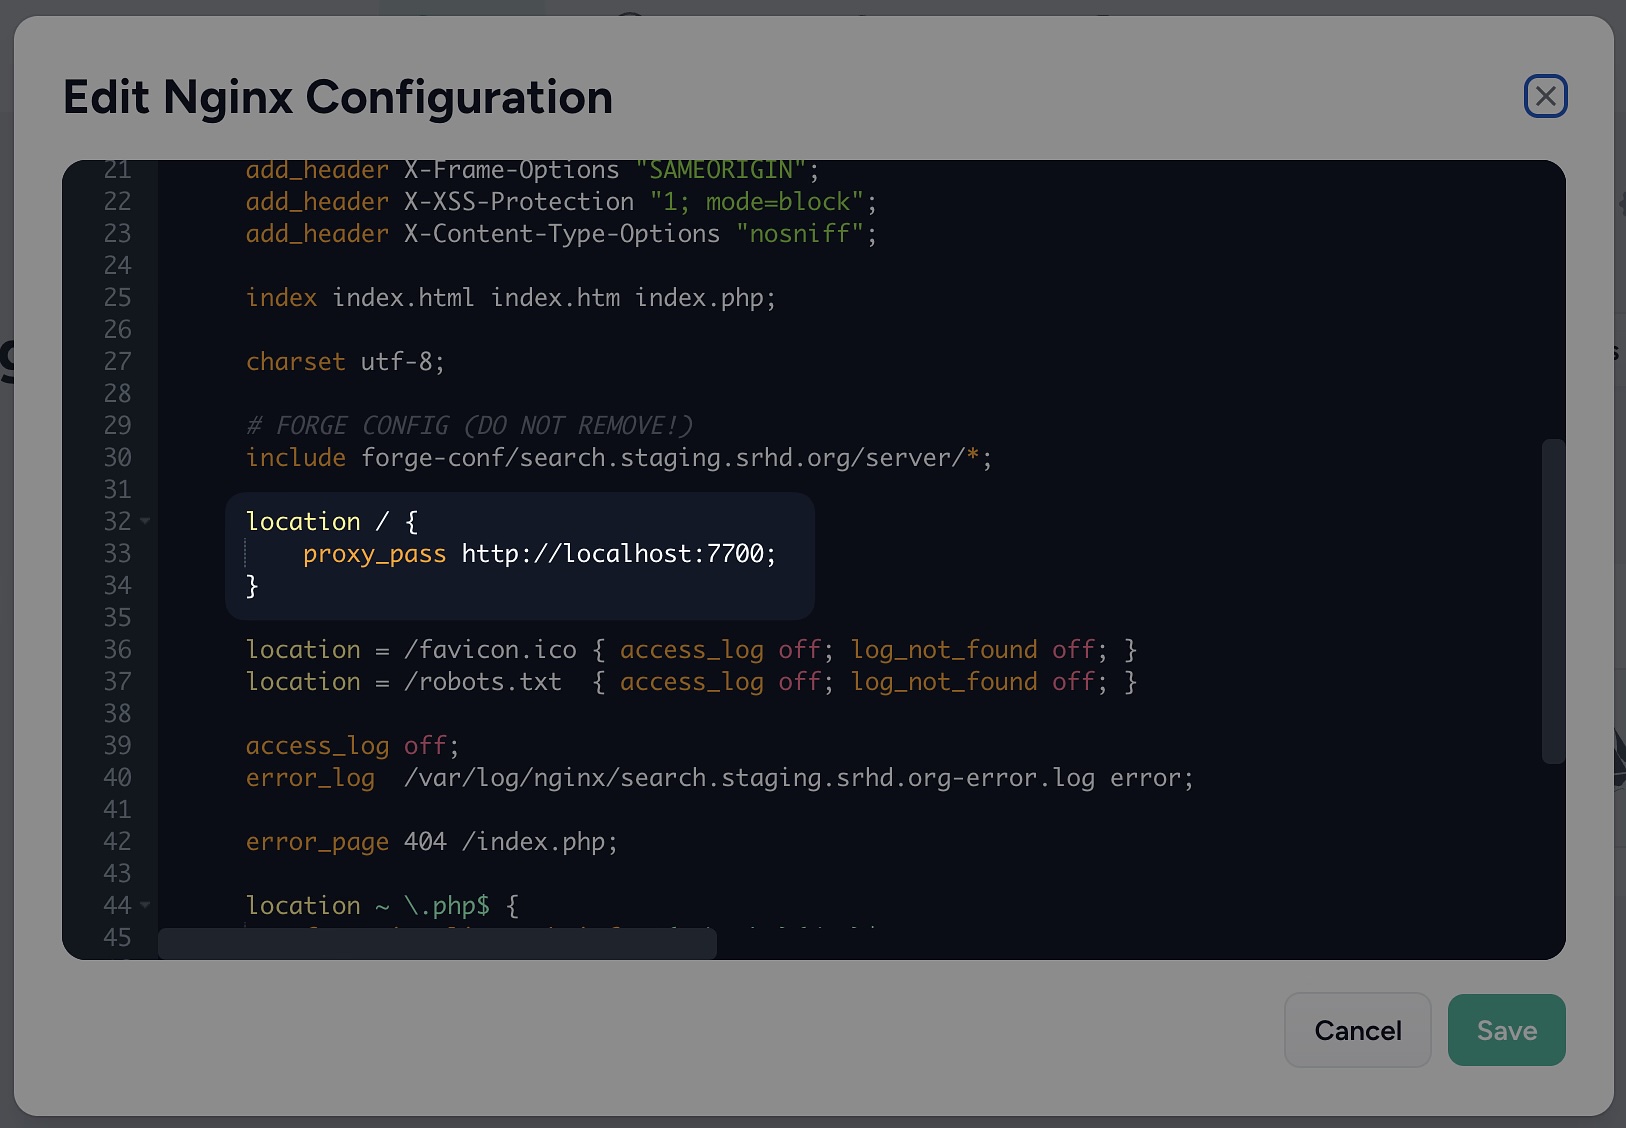
- Above the line that says something similar to
include forge-conf/<site id>/site.conf;, and below the SSL config, add the followinglocationblocklocation / { try_files $uri $uri/ /index.php?$query_string; } - That section of config should now look similar to
this
- Save the config
- ❗️This is important because switching to another config file will cause the changes to be lost
- Repeat steps 3.2 to 3.6 for every domain that needs to serve regular content
- Note that at this point the Nginx service hasn't actually reload because the config is technically incorrect. The next steps will fix this.
- The primary site, and any secondary sites need to have this change
- Enable redirects in the general nginx config
- At the top of the Domains page, click "Edit Nginx configuration"
- The modal will have "General site configuration" already selected
- Replace the
location /block with the followinglocation /.well-known/ { try_files $uri =404; } - That section of config should now look similar to this
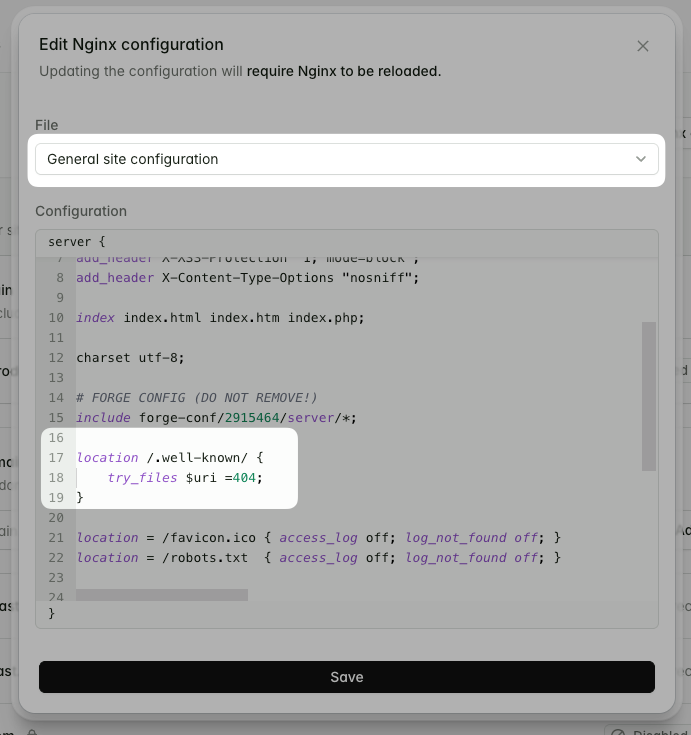
- Save the config
- ❗️This is important because switching to another config file will cause the changes to be lost
- At this point the nginx service should reload without issue, and the main and secondary sites should be serving traffic correctly
- Configure the redirect on the new domain
- Add a new Custom domain, with relevant settings (usually the defaults are
fine)
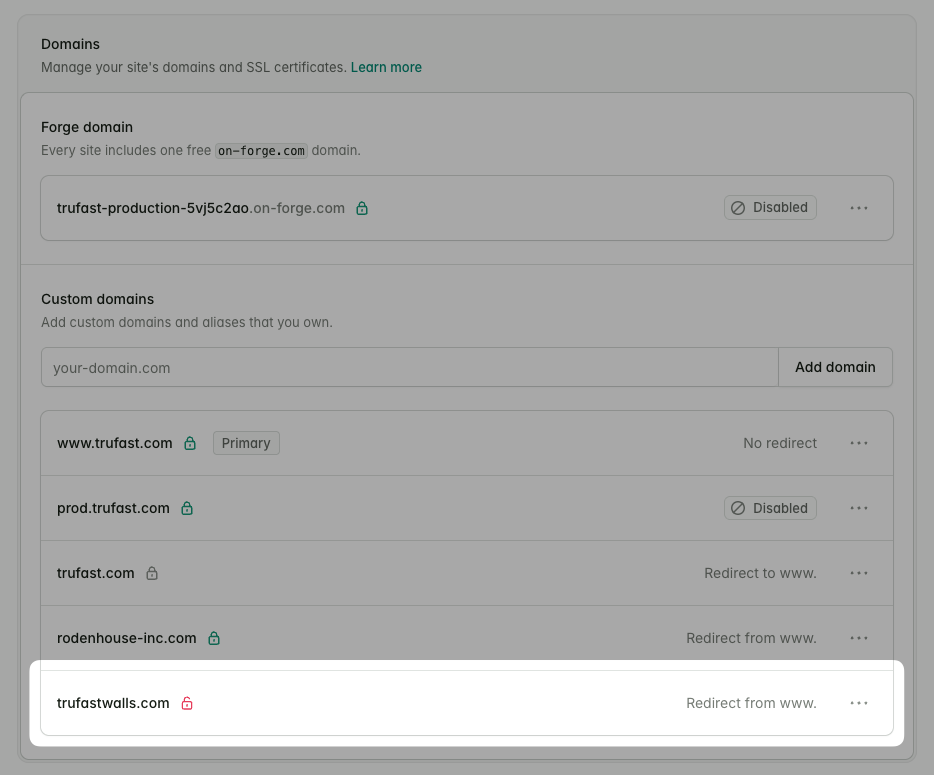
- The domain will be provisioned without SSL enabled, this is fine.
- Click "Edit Nginx configuration" again
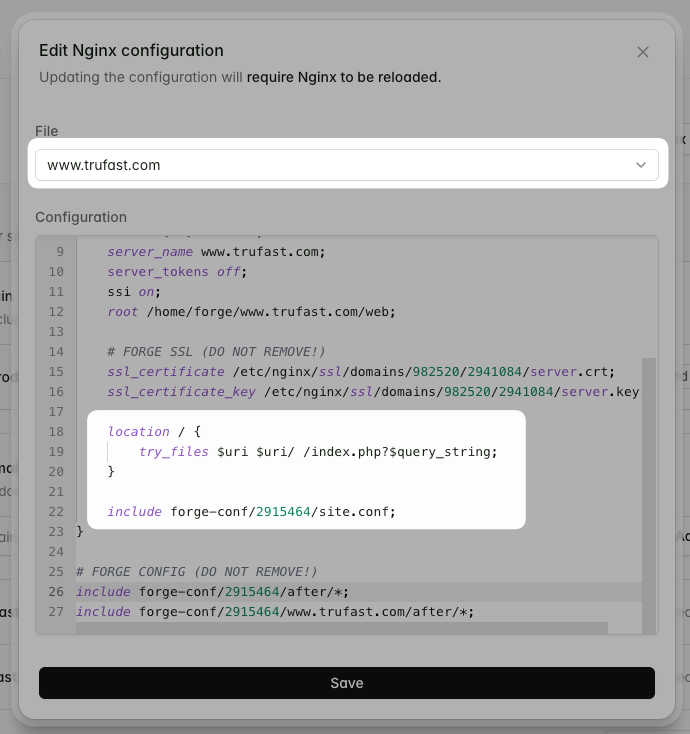
- Switch to the config file for the domain you want to redirect
from

- Above the line that says something similar to
include forge-conf/<site id>/site.conf;, and below the SSL config (this might be commented out still, that's OK), add thelocationblock to return redirects, replacingwww.mydomain.comwith the target domainlocation / { return 301 https://www.mydomain.com$request_uri; } - That section of config should now look similar to this
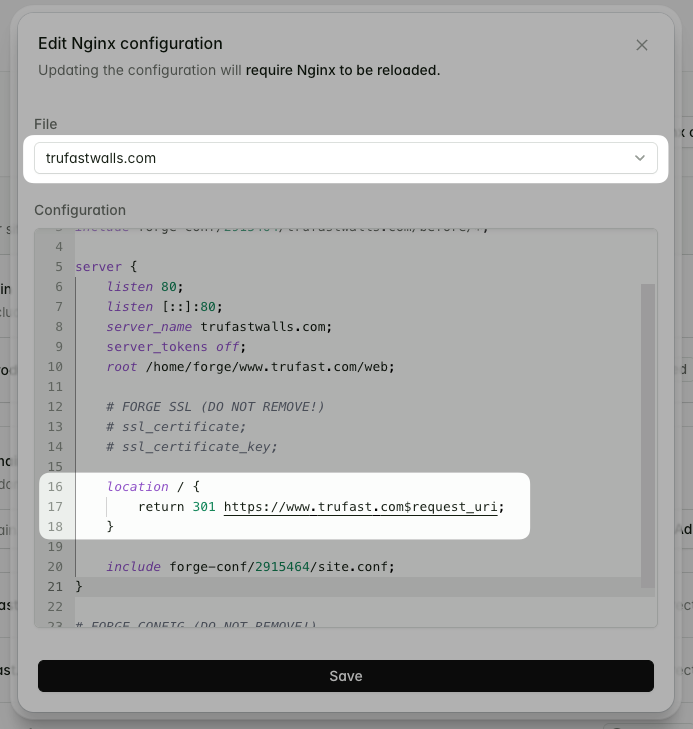
- Save the config
- ❗️Confirm the main site (and any secondary sites) are still working correctly
- Add a new Custom domain, with relevant settings (usually the defaults are
fine)
- Provision SSL
- At the bottom of the Domains page, click "Add certificate"
- Choose LetsEncrypt
- We wouldn't choose others, because if we had CloudFlare in front of the domain, we'd be able to use their redirects instead.
- Select the domain
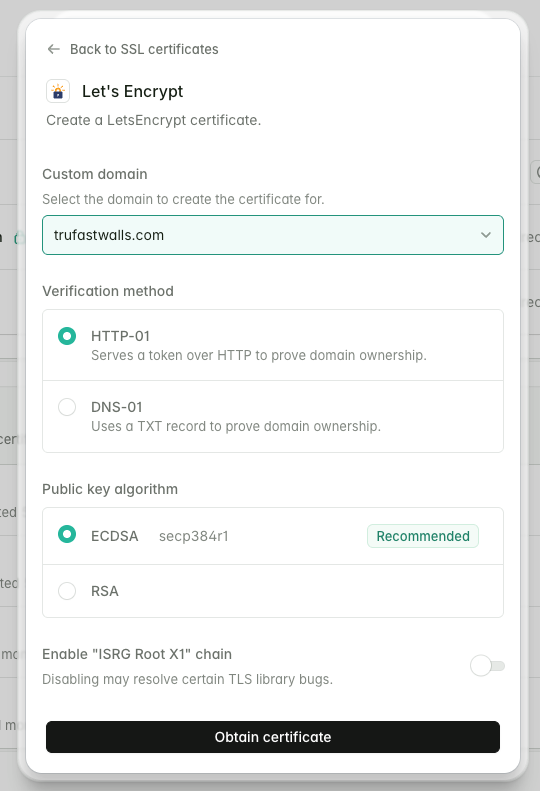
- Click "Obtain certificate"
- It should succeed and activate automatically
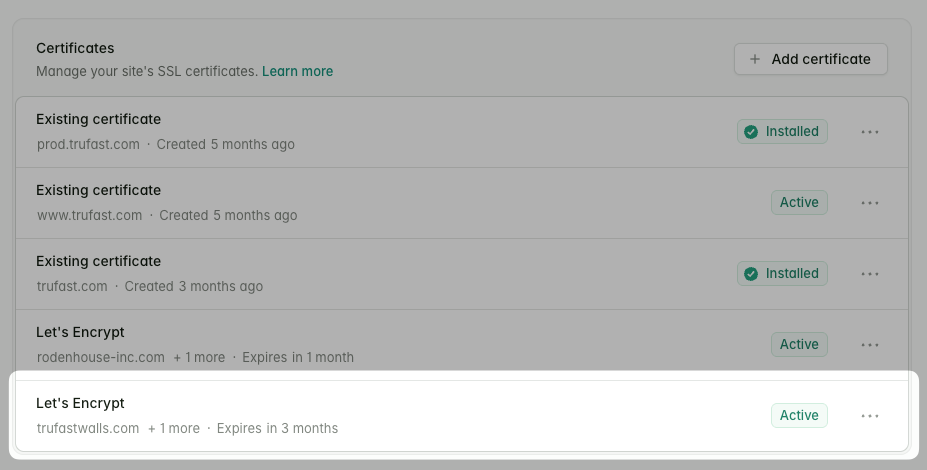
- At this point you can confirm that the redirect is working
curl -I https://trufastwalls.com                                                                                                                                                                                                                                              ~
HTTP/2 301
server: nginx
date: Thu, 26 Mar 2026 08:37:52 GMT
content-type: text/html
content-length: 162
--> location: https://www.trufast.com/ <-- Expecting a location header
x-frame-options: SAMEORIGIN
x-xss-protection: 1; mode=block
x-content-type-options: nosniff
Notes
Ensuring www. redirects correctly
Sometimes, after updating the redirect-only configs, the domains only redirect for request to the root domain, not the www. domain.
To resolve this, edit the Nginx config for that domain, and include the www. domain in the server_name list.
For example: 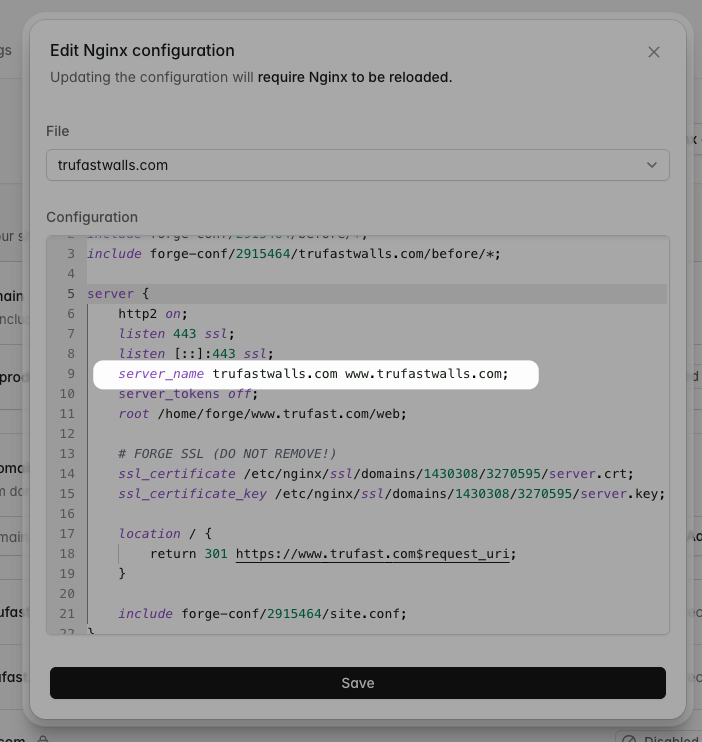
Checking Nginx status
If you need to manually confirm that Nginx is running, or has reloaded successfully:
SSH onto the server and run sudo systemctl status nginx
- When prompted for the password, use the sudo password stored for the project in Bitwarden
If it's running properly, you'll see output like this:
forge@trufast-production:~$ sudo systemctl status nginx
● nginx.service - A high performance web server and a reverse proxy server
     Loaded: loaded (/usr/lib/systemd/system/nginx.service; enabled; preset: enabled)
     Active: active (running) since Thu 2026-03-26 08:37:28 UTC; 19min ago
       Docs: man:nginx(8)
    Process: 4155114 ExecStartPre=/usr/sbin/nginx -t -q -g daemon on; master_process on; (code=exited, status=0/SUCCESS)
    Process: 4155116 ExecStart=/usr/sbin/nginx -g daemon on; master_process on; (code=exited, status=0/SUCCESS)
    Process: 4156422 ExecReload=/usr/sbin/nginx -g daemon on; master_process on; -s reload (code=exited, status=0/SUCCESS)
   Main PID: 4155117 (nginx)
      Tasks: 5 (limit: 9488)
     Memory: 7.5M (peak: 14.8M)
        CPU: 699ms
     CGroup: /system.slice/nginx.service
             ├─4155117 "nginx: master process /usr/sbin/nginx -g daemon on; master_process on;"
             ├─4156428 "nginx: worker process"
             ├─4156429 "nginx: worker process"
             ├─4156430 "nginx: worker process"
             └─4156431 "nginx: worker process"

Mar 26 08:37:28 trufast-production systemd[1]: Reloading nginx.service - A high performance web server and a reverse proxy server...
Mar 26 08:37:28 trufast-production nginx[4155313]: 2026/03/26 08:37:28 [notice] 4155313#4155313: signal process started
Mar 26 08:37:28 trufast-production systemd[1]: Reloaded nginx.service - A high performance web server and a reverse proxy server.
Mar 26 08:56:44 trufast-production systemd[1]: Reloading nginx.service - A high performance web server and a reverse proxy server...
Mar 26 08:56:44 trufast-production nginx[4156422]: 2026/03/26 08:56:44 [notice] 4156422#4156422: signal process started
Mar 26 08:56:44 trufast-production systemd[1]: Reloaded nginx.service - A high performance web server and a reverse proxy server.
If there was a problem, there'll be read highlighted sections. The output would look similar to this:
forge@trufast-production:~$ sudo systemctl status nginx
● nginx.service - A high performance web server and a reverse proxy server
     Loaded: loaded (/usr/lib/systemd/system/nginx.service; enabled; preset: enabled)
     Active: active (running) since Thu 2026-03-26 07:33:36 UTC; 37min ago
       Docs: man:nginx(8)
    Process: 4146242 ExecStartPre=/usr/sbin/nginx -t -q -g daemon on; master_process on; (code=exited, status=0/SUCCESS)
    Process: 4146244 ExecStart=/usr/sbin/nginx -g daemon on; master_process on; (code=exited, status=0/SUCCESS)
--> Process: 4150554 ExecReload=/usr/sbin/nginx -g daemon on; master_process on; -s reload (code=exited, status=1/FAILURE)
   Main PID: 4146245 (nginx)
      Tasks: 5 (limit: 9488)
     Memory: 8.5M (peak: 16.2M)
        CPU: 1.231s
     CGroup: /system.slice/nginx.service
             ├─4146245 "nginx: master process /usr/sbin/nginx -g daemon on; master_process on;"
             ├─4148898 "nginx: worker process"
             ├─4148899 "nginx: worker process"
             ├─4148900 "nginx: worker process"
             └─4148901 "nginx: worker process"

Mar 26 07:56:38 trufast-production nginx[4148892]: 2026/03/26 07:56:38 [notice] 4148892#4148892: signal process started
Mar 26 07:56:38 trufast-production systemd[1]: Reloaded nginx.service - A high performance web server and a reverse proxy server.
Mar 26 08:10:35 trufast-production systemd[1]: Reloading nginx.service - A high performance web server and a reverse proxy server...
Mar 26 08:10:35 trufast-production nginx[4150554]: 2026/03/26 08:10:35 [emerg] 4150554#4150554: duplicate location "/" in /etc/nginx/forge-conf/2915464/site.conf:17
--> Mar 26 08:10:35 trufast-production systemd[1]: nginx.service: Control process exited, code=exited, status=1/FAILURE
--> Mar 26 08:10:35 trufast-production systemd[1]: Reload failed for nginx.service - A high performance web server and a reverse proxy server.
Auto-restart supervisorctl
Sometimes queue jobs fail to restart for various reasons. We don't get notifications from Forge when this happens, so we need to ensure that queues are running without any intervention.
This script should run on a cron every minute, and will restart any supervisorctl processes that have failed and not restarted.
Resources used
Steps
- Add the script below to the repository under the scripts dir, and call it
restart-supervisorctl.sh - Ensure it is executable:
chmod +x scripts/restart-supervisorctl.sh - Navigate to the "Processes" tab for the relevant server in Laravel Forge
- Click the "Scheduler" menu item
- Click "+ Add Scheduled Job"
- Enter these details:
- Name:
Restart Supervisorctl - Command:
export SITE_NAME="<site.host.name>" && /home/forge/<site.host.name>/scripts/restart-supervisorctl.sh- Example:
export SITE_NAME="staging.kooimaag.com" && /home/forge/staging.kooimaag.com/scripts/restart-supervisorctl.sh
- Example:
- User:
forge - Frequency:
Every minute
- Name:
- Click "Create Scheduled Job"
- After a minute or so, confirm that the job has run. It should output "No failed processes".
Script
#!/bin/bash
set -e

failed=$(sudo supervisorctl status | awk '$2=="BACKOFF" || $2=="FATAL" {print $1}')

if [[ -n $failed ]]; then
  echo "Restarting failed processes"
  echo "$failed" | xargs -r -n1 sudo supervisorctl restart
  /usr/bin/php /home/forge/${SITE_NAME}/craft queue/retry all
else
  echo "No failed processes"
fi
Note that if you have custom queue names, you will need to update the queue/retry part, or add additional retry commands, for example:
...
  /usr/bin/php /home/forge/${SITE_NAME}/craft queue/retry all
  /usr/bin/php /home/forge/${SITE_NAME}/craft my-custom-queue/retry all
...